Regulation Horseshoe Pit Dimensions: Official Sizes
Author: Chris Miller | Editor: Omar Alonso
Review & Research: Jen Worst & Chris Miller
Anyone a little older knows the idiom, "close only counts in horseshoes and hand grenades." However, they might need to learn that exact and official horseshoe pit dimensions matter to players.
Horseshoes is a popular game with serious semi-professionals. If you’re building your own backyard pit, use the correct elements and dimensions to enjoy a good match. Here’s what you should know about the official horseshoe pit size.
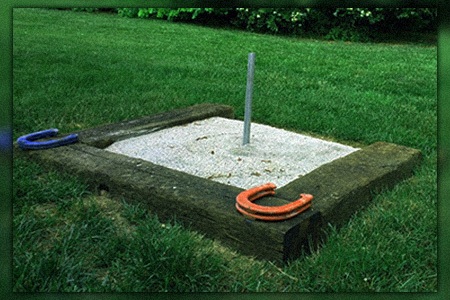
Official Horseshoe Pit Dimensions Diagram
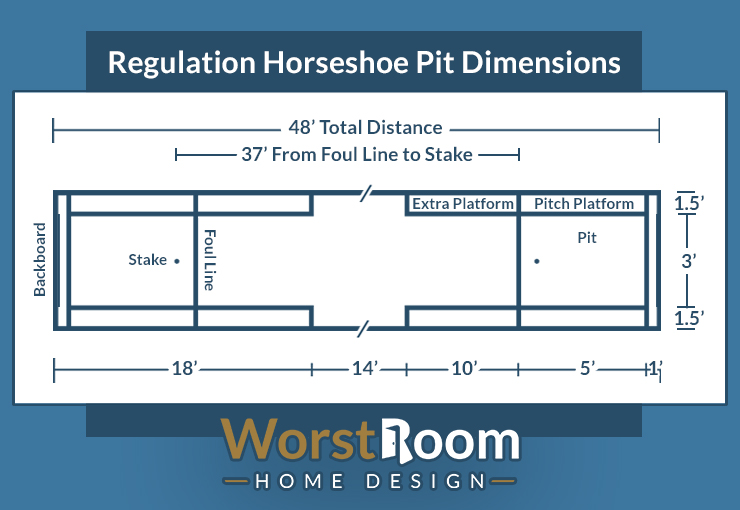
According to the National Horseshoe Pitchers Association (NHPA), the official horseshoe pit dimensions are a thin 40 foot long strip of level ground that is 3 feet wide.
Two 1 inch diameter, 36 inch long stakes made of iron or steel should be driven into the ground at an angle of about 12 degrees from vertical (leaning towards the opponent) so that only 14 inches is sticking out above the ground. The stake is to be centered within the width of the pit and placed 40 feet apart at the longer ends of the pit.
Foul lines are drawn at 27 feet and 37 feet from each stake. The 27 foot foul line is for all women, all children under the age of 18, and all elders above the age of 70 years old. Adult men are to use the 37 foot foul line.
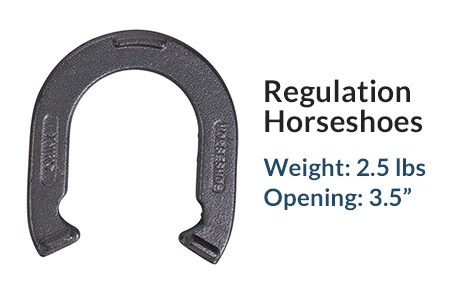
The official horseshoes designed for pitching in the game are manufactured to weight 2.5 pounds each with an opening of 3.5 inches. Each player is to pitch both of their shoes one after another before the other player does the same.
The History & Love of the Horseshoes Game
Shocker, but nearly 15 million people in North America toss horseshoes. There’s even a National Horseshoe Pitchers Association to support the rules of this fun game. Many American backyards have or have had horseshoe pits, even if only for temporary games.
Horseshoe pits are easy to install and don’t require any maintenance. At one time, even the White House had a horseshoe pit on its lawn. Once for President Harry Truman and another for avid fan George H. W. Bush.
Evidence suggests that Greeks and Romans also played horseshoes using the old shoes that chariot horses threw. Tournament horseshoe pits didn’t get an official start until the 20th century. Since it became an organized sport, official dimensions also became standardized.
When the NHPA formed and set the rules, court specifics became exact ground rules. Usage includes every topic, from safety to temporary pitches. No more asking how long is a horseshoe pit. It's 40 feet and on the books!
Building a Basic But Accurate Horseshoe Pit
A horseshoe pit game requires only a few bare necessities. Willing players and good weather make the game more enjoyable. Here’s what you need to install the horseshoe pits on your lawn.
- Two sturdy metal stakes set 40 feet apart
- 37-foot foul lines marked from each stake (chalk or spray paint)
- Set of tossing shoes
- Score sheet
In addition, to accommodate multiple players from various skill sets, mark a second set of 27-foot foul lines (for younger players, seniors, or women). However, everyone can play from the original throw line.
An excellent way to create a semi-professional pit is to build a frame with loose dirt (minimum 2” to 4” deep) or filled with soft material like sand. Adding flexible or soft landing material prevents bouncing for more accuracy. It also helps to stop metal irons from hitting ankles in a competitive game.
DIY Horseshoe Courts
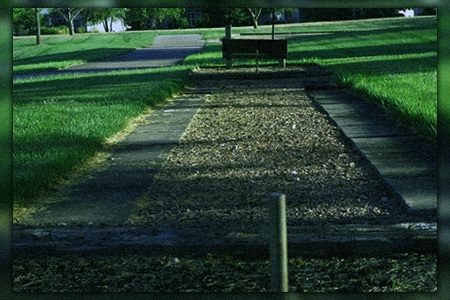
Backyard horseshoe courts are an inexpensive and fun sport arena for the entire family, even if they don't match regulation horseshoe pit dimensions (but try if you can). It’s good for your health and great for being socially inclusive. One of the biggest requirements for horseshoe pit courts is space.
It would help if you had at least 40 feet of court space and overhead clearance. Also, ensure that your court isn’t encroaching on any ornamental flower beds or fragile shrubs. North-south facing direction is best to avoid one side of the team staring into the blinding sun. Horseshoe pits are great near tall trees that provide shade.
Here’s how to begin setting up your pit in backyards or lawns with at least 40 feet of clearance. However, it’s better to have 48 feet to accommodate the players standing behind the stakes safely away from bouncing and rolling horseshoes.
Measure and locate the ideal space:
- Choose your spot and measure the distance (walk it out for an estimate first)
- Look for flat areas that don’t have any overhead or throwing restrictions
- Keep an eye on sun direction
- Mark your ideal plot with spray paint or chalk
Keeping an eye out for overhead lines or low tree limbs is optional since the game is played close to the ground. Aim for having 12 feet of clearance for arcing tosses. You'll also need to dodge any types of sprinkler heads in the ground, as well.
However, you need to add space where each opposing team can stand during the game. Also include swing space and consider a safe space for spectators to enjoy watching. Competitive games can get rambunctious; shoes can travel outside the pit and hurt an innocent bystander or pet. An area off to the side is a great place to watch both ends of the pitch.
If you love the game and don’t have the space, you can shorten the distance. However, your arm has a throwing memory which might affect your game. A similar game that takes up less space is cornhole. If you're interested in that, we've talked about how to build and finish cornhole boards here.
Materials to Build a Horseshoe Pit
Now that you’ve picked and marked your intended court space by the official horseshoe pit dimensions, it’s time to dig. Although how involved you make your court depends on how much you plan to enjoy the game.
Gather your tools:
- Retractable measuring tape
- Plumb chalk line (to keep straight)
- Shovel and rake
- Wood cut-offs, 2 X 6 or similar pressure-treated wood (optional)
- Two metal stakes that are long enough to leave 14” above ground
- Sledgehammer or axe
- Saw (power tool or hand saw)
- Sand, pea gravel, or pit clay
- Landscaping material (optional but good idea)
- Wheelbarrow to remove excess dirt
- Safety glasses and gloves
Although eons ago, before the game became a rendition of today’s version, players might have used real horseshoes. Today’s game requires horseshoes made for the game. They have angular insides to catch better on the stake for accuracy. They’re readily available at most sporting stores.
Look for authentic horseshoe-pitching shoes that:
- Weigh 2.5 to 3.5 lbs
- Have a 3.5” wide opening
- Come in two different colors for opposing teams
- Use soft steel iron 1” diameter (as included in store-bought sets)
- For real DIY, you can use 1” rebar
- Sand or synthetic fill material (set out in the NHPA rule book)
You should be able to purchase these horseshoes online. Don't use actual, non-regulation shoes that are meant for horse hooves. Build the pit using at least 2” to 4” of fill (sand) or, according to NHPA, use 8” of fill for official or permanent in-ground pits.
Building a DIY Regulation Horseshoe Pit
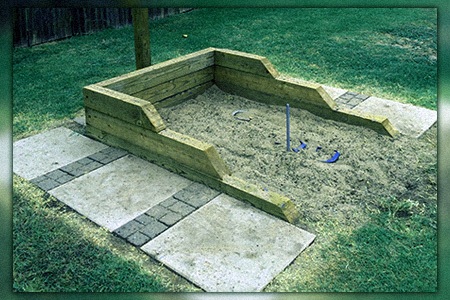
Using the horseshoe pit size outlines and setting the stakes 40 feet apart (the official horseshoe pit distance), mark the foul lines at 37 feet. Regulation horseshoe pit designs are between 43” and 72” long and 31” and 36” wide, depending on the age and gender of the players.
Once you decide on which dimension you want the pit to be, cut the pressure-treated lumber to the correct dimensions. Cut the wood to length, like 72” by 36”, and have eight pieces with your desired specs (meaning four boards for each size).
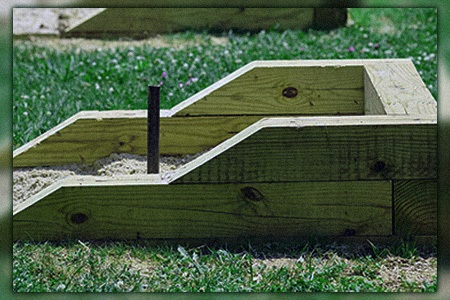
The stake should be in the center of the pit. Dig deep enough around the perimeter to make the boards fit and sit flush. Any obstruction can affect the throw of the horseshoe and also become a lawn-tripping hazard.
You can easily screw the boards together into a frame using a drill or in a pinch with a hammer and nails. Just know that the wood frame will get repeated use from the horseshoes and people trampling it.
Place the board frame into the trenches you dug to fit and force it into place. Now dig out the interior with a shovel, and remove any roots or debris. Once you reach a depth of 2”, 4” to 8”, rake smooth (any types of rakes will do) and line with landscaping material to prevent weeds from reclaiming the soil.
Next, fill with sand or suitable fill material. Sand is an inexpensive option. Tiny pea-gravel left over from DIY projects also works well. If you want to get technical, use pit clay.
Pit clay is a superior choice used for tournament horseshoe courts. It’s moist and helps the horseshoe stick better than sand.
Setting the Stakes
Measure the optimum stake placement at least 21” from the front of the box. Using a set of safety glasses and gloves, drive the stake into the ground, angling slightly toward the stake in the opposing box. Leave 14” of the stake above ground and aim for a 3” off the vertical or a 12 degree lean.
Some people fasten the stake by reinforcing it with concrete to secure the stakes and prevent them from moving.
There are several methods. One is to make a bucket with wet cement and insert the stake. Then bury the stake but remember the predefined dimension of where to place it and angle it and allow time to cure.
Another easier way is to dig the stake hole, add dry cement powder, place the stake in the desired spot, and fill it with soil, then sand. Add a light touch of water and allow the cement to cure.
Others go even further and weld an anchor plate to the stake to keep it in place. Add a backstop for anyone worried about children, pets, or vulnerable garden ornaments. Any types of artificial grass are at risk, as well. It’s easy to use leftover lumber to build a backboard and stake it to the ground four feet away from the stake.
Outdoor Lighting
For die-hard horseshoe players, consider illuminating the play area. However, the caveat is that lighting might attract pesky insects. Even termites are attracted to lights.
Place the lights off-center and not directly above or behind other players. Lighting shouldn’t impede players’ sight or swing trajectory.
You can hang your horseshoes when not in use outdoors (as long as they're sealed and won't become rusted) and you can bring any extras inside. Hanging horseshoes for good luck is fun if you're really into the game.
Official Horseshoe Pit Dimensions Made Simple
A game of horseshoes is great fun for family and friends. It’s also inexpensive and gets people back outside to enjoy outdoor living. Installing your DIY horseshoe court can be as complicated or easy as you want it to be.
To make the most of your outdoor activities, involve the entire family in the build according to the official horseshoe pit dimensions, setup, and the weekend tournament. Keep score and even run full seasons of the game! Remember, the official horseshoe pit distance is 40 feet, so no cheating!
You'll Also Enjoy:
- What to Put Under a Trampoline: 10 Ideas & What to Avoid
- 12 Types of Shovels Essential to Your Yard Work Needs
- 19 Types of Lawn Mowers for Every Yard & Style
- Chamomile Lawn: How to Grow This Better Ground Cover
- 4 Alternatives to Underground Sprinkler Systems for Lush Lawns
Author: Chris Miller
 Chris has over a decade of experience in the lawn care and maintenance industry. His intricate understanding of the procedures and tools required knows no bounds. Chris serves as reviewer and researcher for our editorial team and as an author in his areas of expertise. Learn more on Chris's author page and all about Worst Room here.


