The DIY Wattle Fence Guide - How to Build & Preserve
Author: Jen Worst | Editor: Omar Alonso
Review & Research: Jen Worst & Chris Miller
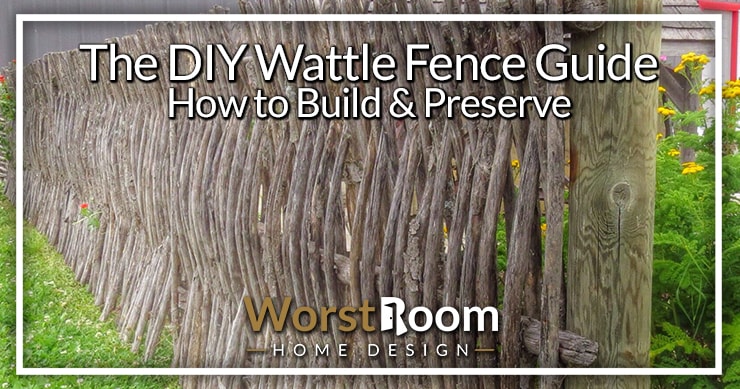
Knowing how to build a wattle fence is a small hurdle between you and a beautiful and natural DIY barrier whenever you'd like it to be.
Do you have a lovely garden, but frustrated over little produce thieves? You also want a robust fence but do not want to invest too much? We have the perfect solution for you- a wattle fence.
The best deal about a wattle fence is that it can be made from materials that you have stored or lying around. And if that is not the case, you can simply forage in the nearby woods for the stuff you need.
But before we dive deeper into the fencing mechanics, let us discuss some interesting historical aspects of wattle fencing. The first trivia tidbit is that the earliest wattle construction was found at Woodcutts Settlement from the British Iron Age, and later was written about by the Roman Vitruvius.
What is a Wattle Fence?
The wattle method is a very convenient method of constructing a woven fence in English countries. Initially, a wattle fence was created to create a boundary for cattle farms and livestock areas.
Even today, these types of wood fences are considered the most versatile construction that is incredibly environmentally friendly and cost-effective. That might be an understatement because there is no cost whatsoever, involved in building on of these wonderful fences.
All the materials you are using come from your yard or the woods anyway. Over time, these fences became an essential part of Victorian gardens.
The History of the Wattle Fence
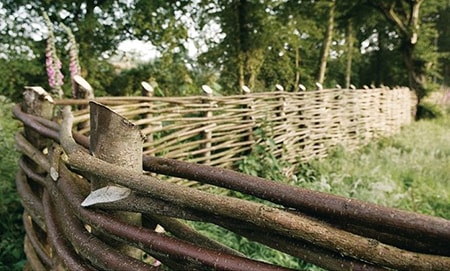
Wattle fences are some of the most ancient art of fencing. These fences were first introduced to the Englishmen. Typically, slender and flexible saplings or suckers of willow trees are preferred to create the wattle fencing.
Excess leaves and buds are stripped, and then the withies are woven into wooden posts. Willow is the most sustainable material that can be used for this purpose. Here's the 11 main types of willow trees so you can identify them as you look for branches.
The preference is simply because Willows are more resistant to splintering, and it can be easily manipulated into different structures. It's all about using pliable wood.
Some useful facts about the wattle fence include:
- When using Willow trees, you might be worried about the "greenness" of the fencing material. But you don't worry about that since the green elements dry up with time.
- They are an incredibly sturdy and robust method of fencing.
- They have a very long life if not purposefully interfered with.
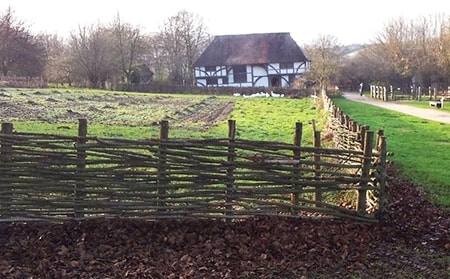
- A wattle fence panel is typically 5 to 7 feet long and can be moved around to make room for different activities.
- Wattle fencing is one of the most affordable fencing types for home gardeners who want reliable protection for their garden, but you have a budget.
These are the prefect fence alternatives to the modern options that are expensive and often unsightly and "try hard".
What Materials are Used for Making a Sturdy Wattle Fence?
These fences have two primary components – an upright or a stake and weavers. Most wattle experts prefer willow trees or chestnut trees as the building block of your fence.
Some alternative options include elm or alder trees. The materials you choose depend on the thickness and length of the branches. Make sure that the elements of your choice do not break when you bend them.
Other tools that you need will include loppers, hand sickles, gloves, measuring tape, mallet or any typical types of hammers, hand sickle, and a tiny drill.
Here is a more detailed description of different weaving materials for weaving fences:
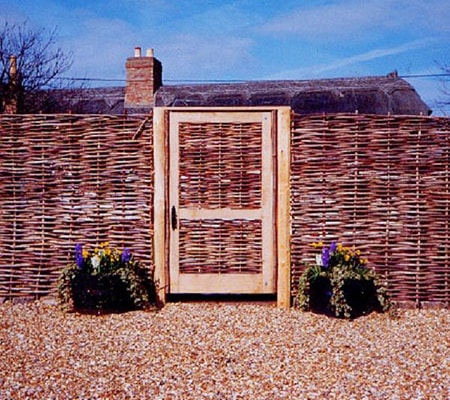
Willow & Reeds
Willow and reeds are excellent for building densely packed wattle fences. The design has a slightly warmer tone, which imparts the wall an extraordinarily rich or dense look.
Haze / Hazel is often used as an alternative for willow trees. The fencing has a more stick-like visual and comparatively, more relaxed tone, although the fence color can vary with different regions.
Bamboo
Bamboo is an interesting material that is used to weave the fences. Bamboo wattle fences are very sturdy and last longer than other barriers, regardless of the types of bamboo you use.
Does My Garden Need a Wattle Fence?
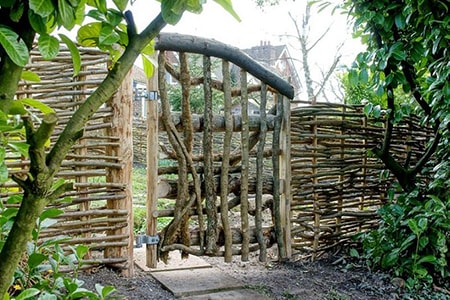
A wattle fence is a fantastic integration to ward off the unpleasing feature of a piece in an area. Boundaries like these can enhance the appeal of your garden. They can also shield and shelter a private space effectively.
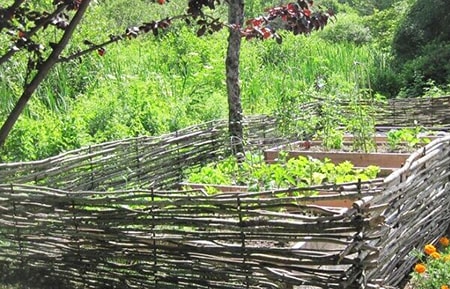
For gardeners, these fences are also especially useful in keeping the wildlife from stealing your garden's precious produce. Wattle fences are a traditional English barrier that is both functional and very pleasing to the eyes. We have some more fence ideas if you want to explore other concepts, too.
Allowing climbing vegetables to grow up your fence will not only save space in your small garden but will also strengthen the walls of your fence.
How to Build a DIY Wattle Fence
A wattle fence is woven to make panels or upright poles which are then sunk into the ground. Horizontal weavings from the same material then continue the uprights. The finished fence largely depends on the types of material you used and the technique.
Follow the steps mentioned below to get a comprehensive idea about building a sturdy fence with ease.
Here is a simple step-by-step guide on how to build a wattle fence:
Step 1 - Collecting the Materials for the Fence
Begin by gathering a considerable amount of material you could find in your backyard, garden, or nearby woods. Willow is the ideal material for fencing.
But if it's not accessible to you, Sweet Chestnut is also another good alternative to willows. Cut the branches from the trees without breaking them. Gather the bundles into a big pile.
Step 2 - Drilling and Necessary Groundwork
The stake of poles needs to be as close as possible to 1 ½ inch in diameter. They can be larger than that, but not smaller. Drill holes into end caps using any types of drills (a battery-powered drill is best for this application) and the right types of drill bits.
The upright structure should be around 3 to 4 inches in diameter. You need to sharpen one end of the pole. This side of the pole is hammered into the ground. The poles should be sunk up to 12 inches deep for static fences.
If you are making a portable fence, you can use a wooden pole of the same length as the panel. You need to drill around 6 to 8 holes into the panels to ensure the resultant structure is firm in its place.
Step 3 - Wattle Fence Construction
There are two types of wattle fences based on what function should your fence serve. The moveable kind, for portability, and non-moveable type for static sturdy protection and aesthetics.
Step 4a - Construction of Moveable Wattle Fence
Use a mallet to tap your uprights into the wooden panels. Make sure you maintain an even spacing, and while the weaving is smooth and even.
Pick a weaver stick to weave the materials horizontally. Begin by leaving on the left side and leave a few overlaps in between the uprights. If you have an excess weaver, leave it for later after the first row has been woven.
Use a new weaver and follow the same pattern. Continue to weave, using new weavers until you reach the desired height for your wattle fence.
Finalize the excess length of the weaver sticks using a pair of loppers. Leave a few inches and then overlap the last piece of your upright.
Once you have done the necessary trimming and your wattle fence looks exactly the way you want... There you have it! A fool proof portable fence to be used wherever you want.
Step 4b - Construction of Non-Moveable Wattle Fence
Mark a jagged line around the area where you would like to install the fencing. For a straight fence, use a straight wall, and if you want some curve in your fence, use a garden hose for a base to build the fence.
Use the line or the tube as a guide, mark every 8 inches on the entire length. Begin from the left side. You can use any available tool to make the holes at the marker point. The holes should be around 8 inches deep.
Choose your weaving materials. Starting from the left-hand side, begin the weaving process. Continue with new weavers until you have reached a depth of around six weavers.
Move the tip of the initial weave and using a new weaver, ease the longer end behind the basic upright structure. Continue this method along the entirety of your fence. Do the same for the second layer.
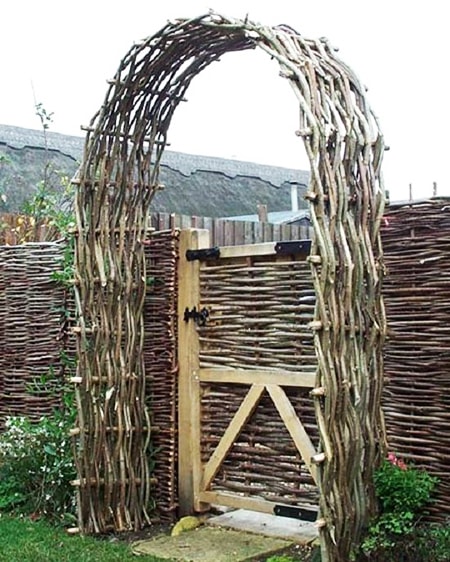
Once you have reached the desired fence height, leave at least an inch long of the upright at the top. Tidy up the loose ends by trimming on the right side of the constructed fence. Your impenetrable static wattle fence is ready!
As seen above, you can still set posts and add a hinged gate door with decorative gate latch types and really make your entrance something special.
Step 5 - Preserving the Longevity of Your Wattle Fence
Treating your fence with appropriate wood chemicals pays off in the long run. Your Fence will be reasonably immune to certain environmental elements.
You can use wood preservatives such as linseed oil or turpentine oil. Both chemicals are easy to use as they are typically already present in your garden storage.
Wattle Fence Mastery In Your Hands
Wattle fences are an incredibly fantastic way of using your trimmings or the fallen branches of your willow trees. Instead of burning these woods away, you can use then to beautify your landscape with zero expenditure.
Willow is the most preferred material for constructing a wattle fence; it's a somewhat flexible art. There is no better way than using the gifts of nature to make proper visual elements and protective barriers for your space.
You'll Also Enjoy:
- 11 Types of Ferns, Indoor & Outdoor, to Liven Up Your Space
- How to Kill a Tree Stump: 4 DIY Ways to Remove it for Good
- 9 Types of Cactus to Bring Beauty & Interest Into Your Home
- How to Save a Dying Tree: Easy Tree Health Success
- Fertilizer Numbers: What N-P-K Numbers Mean
Author: Jen Worst
 Jen works professionally as a gardener and frontline counselor, engaging the youth in vocational work related to gardening. She displays this same passion at home, tending to the vegetable garden and flower beds, as well as to the interior decor and cleaning. Jen serves as reviewer and researcher for our editorial team and author in her areas of expertise. Learn more on Jen's author page and all about Worst Room here.


