Why Drywall Tape Separates From Ceilings & How to Fix It
Author: Omar Alonso | Editor: Omar Alonso
Review & Research: Jen Worst & Chris Miller

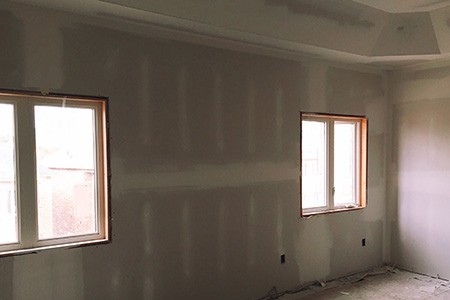
Is your drywall tape separating from the ceiling? It's a frustration experienced by many homeowners. Why is it happening, and what can you do to repair the problem? This post unpacks everything you need to know about drywall tape coming off the ceiling seams and what to do about it.
5 Reasons Why Drywall Tape Separates From the Ceiling
There are several reasons why drywall tape is separating from ceiling seams in your home. It's not about the types of drywall or anything that obvious. Let's look at the top factors influencing this problem.
1) Foundation Settling
Settling in the building's foundations is one of the top causes of drywall tape separating from the ceiling. All foundations settle after construction. You can't stop this process. The variation in settling can be extreme or normal, depending on the ground, the construction work, and other factors.
The pressure levels in the walls created by the settling of the foundations lead to cracking and other problems like the drywall tape separating. A shift in the buildings foundation can cause drywall tape separation where the walls and ceiling meet.
2) Poor Drywall Finishing
Due to poor construction work, cracks might form on drywall joints with improper taping. Poor workmanship leading to bad drywall jobs is a common factor creating this problem. Drywall taping is an important part of finishing the drywalling process. You can fix bubbled drywall tape, but it's still a waste of time to have to do.
If not done correctly, it creates cracks and bubbles in the ceiling drywall, resulting in drywall tape separation. This is likely to happen when using certain drywall alternatives as well, which isn't always recommended on a ceiling..
3) Lifting Trusses
Condensing moisture soaking into the top chords creates an expansion of the wood. The truss starts to move upward, resulting in a problem called "truss uplifting."
If the builders nailed the truss to the wall plates, the stress from nailing the trusses creates expansion at the joints between the bottom and top chords leading to the wall separating from the ceiling, causing cracks in the drywall tape in the ceilings and walls.
4) Vibration & Structural Movement
Vibrations from construction activities and geological movements like tremors and earthquakes can cause the foundations of your home to shift. This movement changes the structural integrity of the walls, resulting in the drywall tape cracking and separating from the ceiling.
5) Excess Moisture
Older roofs may experience cracks in tiles or damage to the flashing, resulting in leaks. Strong winds can lift tiles or blow them off if you live in an area with severe weather events, like hurricanes and tornadoes. When moisture penetrates the roof resulting in yellow or brown water stains on the drywall ceiling. The humidity lifts the tape away, causing cracking.
7 Simple Steps to Fix Drywall Tape Separating From Ceilings
Now that we know what causes drywall tape separation from the ceiling let's look at how to deal with the issue. Repairing drywall tape separation isn't that challenging of a job. Provided you have some basic handyman skills, you should find it relatively easy to sort it out.
With the right technique and tools, you can complete long-lasting drywall repair. However, if you don't have any handy skills, or are sure your drywall seams on the ceiling are showing due to a larger issue, it's better to skip this section and call a professional to fix it.
Are you ready for action? Let's dive right in and repair the loose drywall tape on the ceiling. Don't worry, it's not hard, but will take a little bit of time. You'll find it fun and interesting, I'm sure.
1) Assemble the Right Tools
First, you'll need the right tools for the job. Check your toolshed for the following, or order them from the local hardware store or an online retailer.
- A ladder capable of reaching the ceiling
- A plastic drop cloth
- Protective gear like gloves, a dust mask, and goggles
- Utility knife and spare blades
- 120, 150, and 220 grit sandpaper for drywall and a sanding block
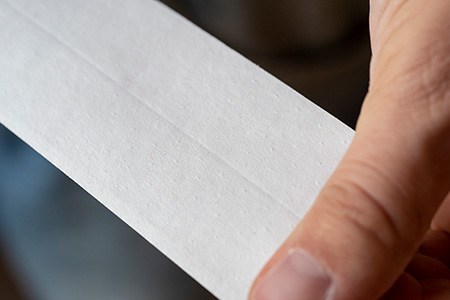
- New paper or mesh drywall tape
- Putty knife
- Drywall mud, aka joint compound
- Texturing sponge or texturing spray product
When you have everything ready, it's time to tackle the job head-on. Follow this process for the best results with your work.
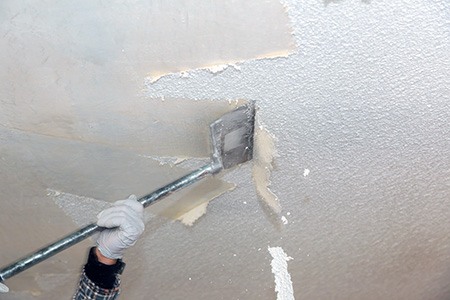
2) Remove the Loose Drywall Tape
Prop the ladder up to the ceiling and ensure a stable foundation. Don't stand on the last two rungs of the ladder, or you present a fall risk. It's a good idea to have someone hold the ladder to stabilize it when working.
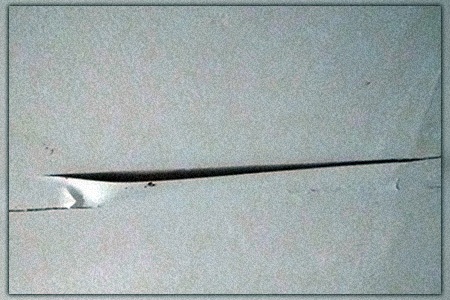
That drywall tape coming loose on the ceiling? Cut the loose tape away using the utility knife until you feel it's solidly connected to the ceiling, and don't leave loose ends. Take care to not damage the rest of the drywall when removing the loose tape. Don't make the mistake of adding a joint compound under the loose tape.
Removing the loose or damaged tape is more effective than applying joint compound under the loose tape. Puttying the loose drywall tape results in uneven, lumpy drywall seams that don't adhere well. This strategy will likely result in it coming loose again in a few weeks or months.
3) Sand the Affected Area
Sand the seam around the affected area after removing the loose tape. Use 120-grit sandpaper followed by 150-grit for a smooth finish. Do not use powered types of sanders here, you only need your own elbow grease. Don't sand through the drywall's paper covering. Remove the old joint compound and create a clean repair surface.
A 120-grit sandpaper around a sanding block provides the best finish. You'll likely remove some ceiling texture during the sanding process. Wear your gloves, eye protection, and a dust mask to filter out particulate matter.
Don't worry about removing some ceiling texture around the seam. We'll repair and match the ceiling texture after completing the repair. Make sure you clean the dust from the surface with a soft brush or cloth so the new tape will adhere correctly. Cleanliness is critical in ceiling tape repair and a dirty surface may be part of why you're in this mess in the first place.
4) Install New Drywall Tape
Use self-adhesive mesh drywall tape for the best results with your repair. Tape the exposed seam and don't overlap it with existing tape at the ends of the repair area. It's fine to have a 1-inch gap between the beginning of the new tape and the end of the old tape.
Mesh drywall tape is easier to work with than paper type. Tape up the exposed seam, but don't overlap the new and old tape. You can also do this over less severe types of ceiling cracks.
After you have it in place, use a putty knife to spread the joint compound over the tape. Blend it onto the tape to create a smooth finish. Start with a thin layer and build on it to create the best finish possible.
5) Use Several Coats of Joint Compound
It's important to take the process in steps and build on each layer of joint compound rather than slaughtering a thick layer and trying to smooth it out. Working in increments is the best method for optimal results.
Apply a coat of joint compound and wait for it to dry. It takes around 24 hours for the compound to dry before you can build a second layer. After the compound dries, sand it with 150-grit sandpaper wrapped around your sanding block.
Apply another coat and repeat the process until you finish the job. It might take two to three layers to get the desired results of a smooth seam. Lay your drop cloth on the floor below the area you're working on to collect any material that drops off the ceiling.
6) Sand the Joint Compound
After you're confident with the repair, it's time to sand it completely to finish the job. Start with 120-grit sandpaper and remove any ridges or bumps. Follow with a 150-grit to create a smoother surface, and finish off with the 220-grit to get the best results with your repair job.
Always sand with a sanding block. Doing it with your fingers will produce divots and ridges that look terrible. Ensure you wait for the joint compound to dry completely before sanding.
If you try to sand a slightly damp compound, it will rip away, and you'll have to clean it off and start the entire process again. After you're done with the sanding, it's time to start the texturing process. That's how to repair loose drywall tape on the ceiling, and now it's time to put the final polish on the job.
7) Tips for Repairing Textured Ceilings
You'll need to match the repair to the surrounding area when repairing drywall tape cracks and separations for textured ceilings. A flat look to your repaired area will stand out against a textured ceiling, creating a poor aesthetic.
You have two DIY options for texturing a ceiling. The first is using a spray-based texture to match the surrounding area. These products are available online or from your local hardware store. You spray the product onto the site, drying it in a textured finish. It's a simple and convenient way to finish off the job.
The other option for the finish is to use a texturing sponge. Di one side of the texturing sponge in some joint compound and dab it onto the repaired area on the ceiling to mimic the surrounding ceiling texture. It can be hard to achieve the same drywall texture as was there, but getting close will make it unnoticeable to anyone that's not you. Remember to keep the drop cloth on the floor to catch any falling material.
The process takes trial and error, but it's no rocket science. Experiment by dabbing texture on a piece of cardboard using the sponge and putty knife to scrape away the excess lightly. Don't use a heavy-handed approach for this part of the process. Please wait for 15 to 20 minutes after applying it to scrape the excess. For another look at how to tape and mud drywall, check out Home Depot's explanation.
Drywall Tape Separating From Ceilings Can Be Fixed
The process of an effective and aesthetic drywall tape repair is easy if you know what you're doing. Follow the steps in this post, and you shouldn't have problems completing the job successfully. With the right tools and technique, your ceiling will look like new. Now you don't need to be concerned if your drywall tape is separating from the ceiling.
You'll Also Enjoy:
- 13 Types of Drywall Anchors to Hang Any Weight Safely
- What Color To Paint a Basement Ceiling? 7 Tips
- How to Hang Curtains in a Rental Apartment in 14 Ways
- 12 Types of Walls Used for Interior & Exterior Construction
- Cove Ceiling: Adding Sophistication to Your Interior
Author: Omar Alonso
 Omar has over twenty years of experience as a professional handyman and electrician, with an emphasis in HVAC, general maintenance and repairs, and interior and exterior construction. He shares this knowledge with us as a writer on these topics. He is also a voracious reader. Omar serves as editor for our editorial team, author, and as a source of endless information for our researchers. Learn more on Omar's author page and all about Worst Room here.


