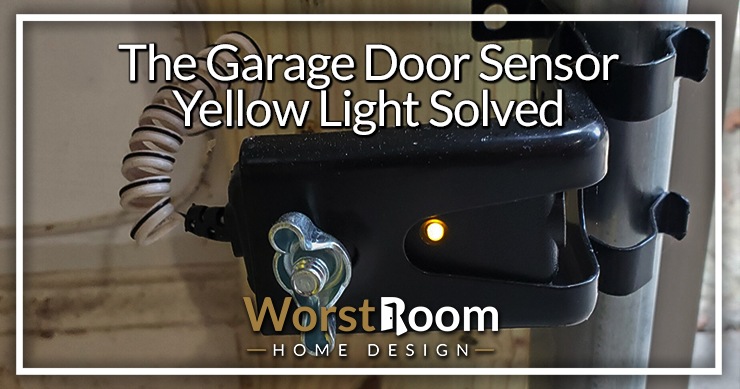
The Garage Door Sensor Yellow Light Solved
Author: Omar Alonso | Editor: Omar Alonso
Review & Research: Jen Worst & Chris Miller
When dealing with a garage door sensor yellow light, it's essential to understand the underlying causes and how to address them effectively. In this guide, we will delve into the details of garage door sensors, their purpose and advantages for your home, and how to diagnose a yellow light on them and replace parts when needed.
In this guide, we'll provide insight into resolving a yellow light issue on your garage door sensor by pinpointing potential causes and giving clear instructions for resetting the system. We'll also discuss replacing your garage door sensor when necessary, including choosing the correct replacement part and installing it correctly.
By following our recommendations in addressing issues related to a garage door sensor yellow light or other challenges you may face with these devices—you can confidently maintain a safe and functional environment within your home's most frequented entryway.
What Are Garage Door Sensors?
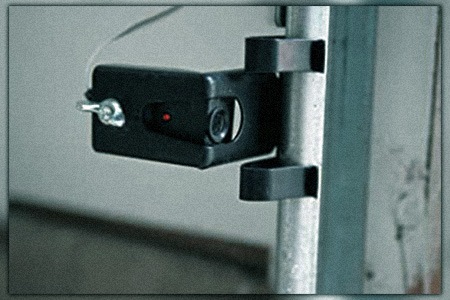
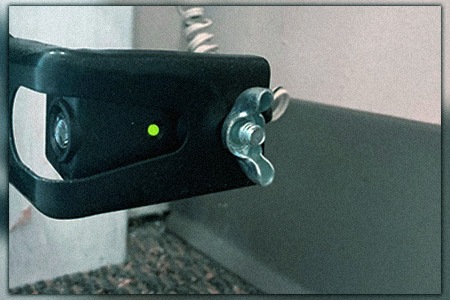
A garage door sensor, otherwise known as a photo-eye or safety sensor, is an obstruction detection device that emits infrared beams that activate an automatic reversal mechanism when something interrupts the path of your closing garage door. These are used in any types of garages with automatic door mechanisms.
When something obstructs the infrared beam emitted by these sensors while the garage door is closing, it triggers an automatic reversal mechanism to prevent accidents or damage to property.
How Do Garage Door Sensors Work?
The operation of garage door sensors relies on two main components: a transmitter and a receiver.
The transmitter sends out an invisible infrared beam across the width of your garage opening towards its counterpart—the receiver.
If nothing is blocking this beam when you attempt to close your garage doors (e.g., no car parked halfway in), then everything proceeds smoothly without interruption.
- If any object interrupts this signal (such as someone walking through),
- The receiver doesn't detect it anymore
- This causes it to send back information about obstruction presence
- In turn, triggering either stoppage or reversal depending on specific settings within the opener control panel software
This is a reason a garage door may only open a few inches and stop. Something is blocking the sensor as the door rises.
Troubleshooting a Yellow Light on the Garage Door Sensor
If a yellow light appears on your garage door sensor, diagnosing the cause and taking corrective action is important. Having identified the cause of a yellow light on your garage door sensor, we'll now discuss steps to take when you see one and how to reset the sensor after troubleshooting.
Common Causes of a Yellow Light on the Sensor
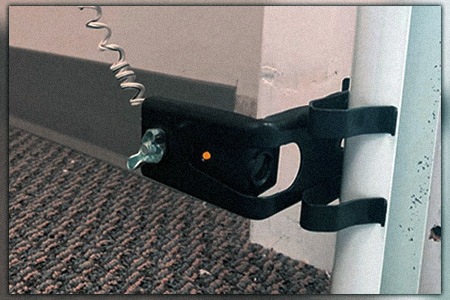
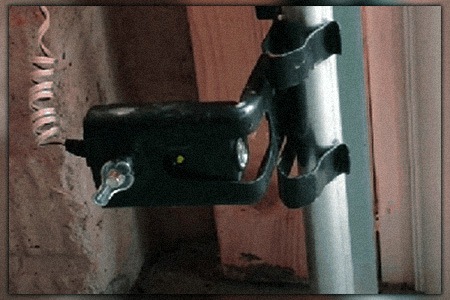
A yellow light typically indicates an alignment or obstruction issue with your garage door sensors. Some common causes include:
- Dirt or debris blocking the sensor's lens
- Sensor misalignment due to accidental bumping or shifting over time
- Loose wiring connections between sensors and opener system
- Faulty or damaged sensors that need replacement
Steps To Take When You See a Yellow Light on the Sensor
When faced with a garage door sensor yellow light, follow these steps for effective troubleshooting:
- Clean both lenses: Use a soft cloth and mild cleaner (such as window cleaner) to gently clean each lens.
- Check for obstructions: Inspect both sides of your garage door opening for objects that may be obstructing either beam path.
- Realign sensors: Loosen mounting brackets slightly so you can adjust them manually until their lights turn green (indicating proper alignment). Tighten brackets once the garage door sensor is aligned.
- Inspect wiring: Check for loose or damaged wires and connections between the sensors and the opener system. If necessary, consult your garage door opener's manual for guidance on reconnecting or replacing any problematic wiring.
- Contact a professional: If you've tried all these steps without success, consider contacting a garage door repair expert to diagnose and resolve the issue.
How To Reset the Sensor After Troubleshooting
If you've successfully resolved the yellow light issue by cleaning, realigning, or fixing wiring issues with your garage door sensor, it's essential to reset it properly. Follow these simple steps:
- Close your garage door completely.
- Cycle power: Unplug your garage door opener from its electrical outlet for at least one minute before plugging it back in.
- Test functionality: Open and close your garage door using both the remote control and wall-mounted button (if applicable) to ensure proper operation after resetting.
Replacing Your Garage Door Sensor
If you've tried troubleshooting your garage door sensor and the yellow light persists, it may be time to replace the sensor altogether. If you determine your garage door sensor yellow light problem is arising from a faulty sensor, follow this procedure:
Identifying the Type of Sensor You Need to Replace
There are two main types of garage door sensors: photoelectric sensors and proximity sensors. Photoelectric sensors use a beam of light that is interrupted when an object passes between them, while proximity sensors detect objects based on their distance from the sensor itself.
To determine which type of sensor you have installed in your garage door system, consult your owner's manual or look up information about your specific model online. Once you know what kind of sensor needs replacing, purchase a compatible replacement part.
Choosing the Right Replacement Part for Your System
When selecting a new garage door sensor for your system, ensure that it is compatible with your existing opener unit and any safety features already installed (such as motion detectors).
If you're uncertain which part to pick, consult your owner's manual or contact the manufacturer for assistance to ensure proper installation and testing of the new sensor.
Installing & Testing the New Sensor
- Disconnect power: Before working on your garage door system, always disconnect power to avoid potential accidents.
- Remove old sensor: Carefully remove the existing sensor from its mounting bracket and unplug it from the wiring harness.
- Install new sensor: Attach the new sensor to its mounting bracket and plug it into the wiring harness. Ensure that both sensors (if applicable) are aligned properly so they can communicate effectively.
- Reconnect power: Once everything is in place, reconnect power to your garage door opener unit.
- Test functionality: To ensure proper operation of your newly installed garage door sensor, test by opening and closing your garage door several times while observing whether there are any issues during this process. If necessary, make adjustments according to manufacturer instructions until optimal performance is achieved.
Note: Always refer to manufacturer guidelines when installing a new garage door sensor, as procedures may vary between different models and brands.
Safety Tips for Working With Garage Door Sensors
When working on your garage door sensor, it's crucial to prioritize safety to prevent accidents and damage to the equipment. In this section, we'll discuss some essential safety tips you should follow when handling garage door sensors.
Wearing Protective Gear When Working With Sensors
Before starting any work on your garage door sensor, make sure you're wearing appropriate protective gear. This includes:
- Gloves: Wear gloves to protect your hands from sharp edges or debris that may be present around the sensor area.
- Safety glasses: Protect your eyes from dust and other particles by wearing safety glasses while working on the sensor.
- Closed-toe shoes: To avoid injuries from dropped tools or heavy objects, wear closed-toe shoes during the repair process.
Disconnecting Power Before Working with Sensors
To minimize the risk of electrical shock or injury, always disconnect the power before working on a garage door sensor system. You can do this by unplugging the opener unit or turning off its circuit breaker in your home's electrical panel.
Additionally, ensure that no one operates any remote controls while you're performing maintenance tasks. If you have trouble with the circuit breaker resetting after then check this out. If you can’t find the breaker box in your house, check these locations.
Following Manufacturer Instructions Carefully
Different manufacturers may have specific guidelines for their products; therefore, it is vital to read and follow these instructions carefully when installing new sensors or troubleshooting existing ones.
To ensure safe and successful installation or repair, it is essential to read the instructions provided by manufacturers carefully; otherwise, mistakes can lead to potential accidents or harm your sensor system. If you're unsure about any steps, consult a professional garage door technician for assistance.
Garage Door Sensor Yellow Light No More!
By identifying common causes of the issue, taking steps to troubleshoot it, and replacing the sensor if necessary, you can keep your garage door working safely and smoothly.
Maintaining your garage door sensor is also important for preventing issues in the future. Regular cleaning and inspection, adjusting settings as needed, and checking connections and wiring for damage are all crucial steps in keeping your garage door sensor in good condition. Say goodbye to that garage door sensor yellow light for good (or at least until next time when you can fix it easily now).
You'll Also Enjoy:
- Why Is My Doorbell Buzzing? Likely the Transformer
- What is a Garage-Ready Freezer? Features & Pros
- How to Fix the Thermopile Voltage Low Error
- Why is My Ceiling Fan Clicking? Fix Common Issues
- Can You Plug a Microwave Into an Extension Cord?
Author: Omar Alonso
 Omar has over twenty years of experience as a professional handyman and electrician, with an emphasis in HVAC, general maintenance and repairs, and interior and exterior construction. He shares this knowledge with us as a writer on these topics. He is also a voracious reader. Omar serves as editor for our editorial team, author, and as a source of endless information for our researchers. Learn more on Omar's author page and all about Worst Room here.


