How to Build Natural Stone Steps Like the Pros Do It
Author: Rick Worst | Editor: Omar Alonso
Review & Research: Jen Worst & Chris Miller
You already know how to build natural stone steps in terms of each individual part of the process. You won't need any new skills to get this done, just our guide on what to do and when to do it as a whole.
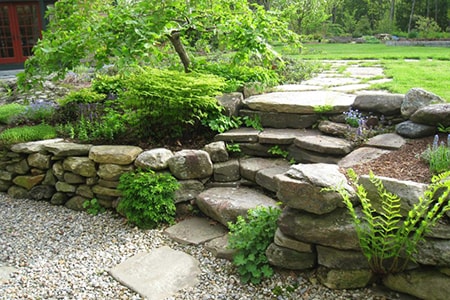
Building stone steps is a fun and exciting project. Once you're done, you'll be rewarded with an aesthetically pleasing set of stone steps. They look elegant in your yard, garden, leading up to your patio, or in the middle of a path on a steep bank.
Most people leave it for pros, but the joy of DIY-ing something in your home always has special meaning and is far more fulfilling. It may look complicated, and to be honest, it's not the most straightforward task to do on your own, especially if you don't have prior experience.
But we're here to guide you through every step. Building a set of natural looking stone steps isn't as hard as other similar projects. You can definitely take up this project if you're willing to expend the energy and time it takes.
It's not tricky, but anything that you do halfheartedly is not going to turn out great. So put your heart and soul into it so it looks great and you can have the bragging rights.
There are many different materials or types of landscaping rocks you can choose from for this project. Choose whatever looks best with your the rest of the landscaping around the area.
You can either choose a rough look with uneven stones, which may look more natural, allowing grass to grow up between the stones, or go for finer and flatter stones for your steps that may have more of a "human touch" to them.
In the end, it all depends upon how you want it to look. Make sure that everything goes well with the other surroundings. Because otherwise, it's going to stick out like a sore thumb.
Mental Preparation for Installing Natural Stone Steps
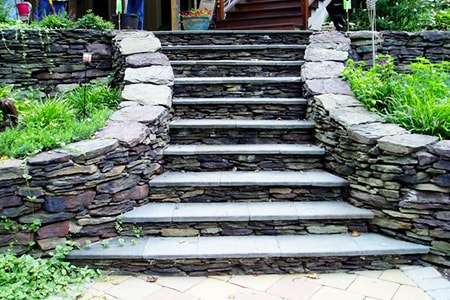
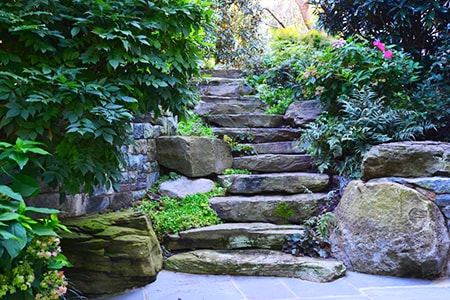
First of all, you need to decide on the stone you want to use for your project. There's a wide variety of flagstones to choose from. They come in almost all possible sizes, finish, and color. Bluestone, limestone, and granite are all wonderful choices for steps actually being and not simply decorative.
This makes it easier for you to decide which one to choose. Analyze your home's style and then search for the appropriate stone. Of course, you can find these in the wild but it's honestly much easier and better to pony up the cash and buy them, in my opinion.
If you want your stone steps to appear natural and rough, then a split finish or rock face finish is right up your alley. If you're going for a more exquisite and refined look, then you can choose your flagstones accordingly based on shape and color.
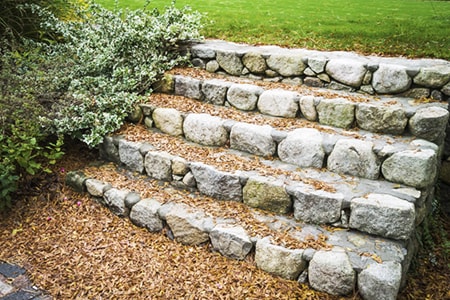
There are options in terms of sizes as well. You can get small stone pieces and then put them together or use them to fill in gaps between bigger but irregularly shaped stones. It's all up to you, but be aware that the small ones can be dislodged over time.
Don't go for tiny stones as they can be difficult to put together. You can either put small stones together to form one step or use one large stone for one individual step. But the tiny ones are going to make the whole step come apart over time.
To use a big stone for one step, you'll need to measure your desired size, keeping in mind the dimensions you're going for. The size and width of your step play a significant role in this.
We recommend using medium sized stones if you're doing this for the first time. Because an overly-large stone would require manual or mechanical help, and a very small stone would require some experience as they aren't easy to put together in a way that looks great. Consider the size used in the types of stone on the outside of a house and aim for that size.
How Much Does it Cost to Build Natural Stone Steps?
Installing stone steps can cost on average around $2,300 on average, depending on the type of natural stone slabs you use as well as the length of the staircase. A shorter staircase can cost as little as $1,000, while the longest can reach as high as $13,000, including labor.
If you perform the installation yourself you can deduct around 40% of the total cost.
Ten steps would require around 25 linear feet of stone slab. Five steps would be around 13 linear feet. Here are examples of pricing you can expect per natural stone slab type per linear foot.
- Bluestone - $15 to $30
- Flagstone - $15 to $55
- Precast Concrete - $20 - $65
- Limestone - $25 to $50
- Sandstone - $30 to $50
- Slate - $30 to $55
- Granite - $45 - $95
Call many locations that offer these stone step slabs so you can find the best deal. Don't forget to ask about loading, delivery, and unloading costs if you want that done for you. Otherwise you will need a flatbed truck and a back brace!
After you are done choosing your stone slabs, make sure they go well with the surroundings and are equally safe for the elderly and children, as much as is possible anyways.
Natural Stone Steps Construction Materials & Plans
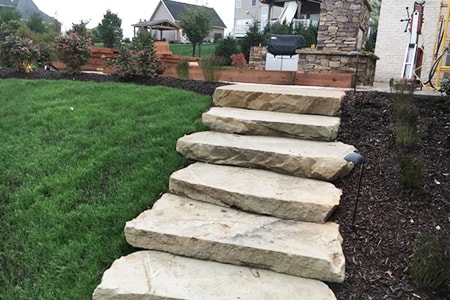
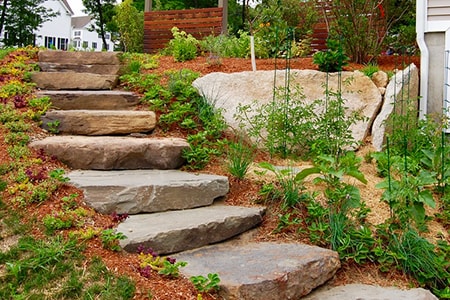
First, think about the depth of each step. Do as you wish depending on the length of the run, but keep your step depth somewhere between 12" and 18" or they will be completely awkward.
You typically want your stones to be somewhere around 6" and 7" in thickness. This will lend itself to helping you create the perfect 7" rise, which we've all come to expect from walking on stairs. If you stray outside these ranges, you'll have far more accidents.
Usually, we go for a 7" riser and 14" run, at the very least. You can go above it, for example, 8" riser and 15" run but don't go below it or too much above it. If the run is too long, then it may become awkward or uncomfortable.
It's always cool if you have to space to make the bottom step the widest and let them become a bit more narrow as you move towards the top. You don't have to do this, but it always feels welcoming and friendly.
You'll also need quite a bit of A-gravel and bedding sand. These are used to create flat surfaces for the stone steps to rest upon that will allow for water drainage and evaporation beneath them.
Calculating the Rise & Run of Your Stone Steps
To find the run and rise for your stair case, we'll have to perform a few calculations. They're not complicated, so don't worry. But you will want a calulator on hand.
Measure the Stone Staircase Run Length
First of all, we will find out the distance of your overall run for the staircase. You should take the measurements horizontally as taking it on an angle is not going to give you proper measurements.
It'd be like measuring the hypotenuse of a triangle when you want to measure the base. Your measurement will come out too long.
You're going to measure from the future face of the top step and future face of the bottom step, but up in the air to a perpendicular point above the bottom step. You can push a big stick into the ground, any types of shovels, a ruler, or anything else long enough to stick up to the full height.
Measure the Stone Staircase Rise Distance
Mark the spot on this rod that's level with the future top steps's base. Now, you'll measure vertically from what will be the bottom step's base to the top step's base. You can simply measure on the stick or shovel where you marked it, from the ground to this mark.
Calculate the Number of Stone Step Slabs Needed
You now have the run (the horizontal length) and the rise (the vertical length). Divide the overall rise measurement by the ideal rise of each step for calculating the number of steps needed.
Know the thickness of the slabs you plan on purchasing first, which is the rise of each step. Dividing your vertical measurement (the rise) by this slab thickness tells you how many slabs you need to purchase, which will tell you more about the expected price.
For the desired run, Divide the total run measurement by the number of stone steps (calculated above). This will tell you if your step depth will be acceptable, which should be between 12" and 18" each.
If you plan on having a bottom step level with the ground, then subtract one from the total number of steps during this measurement. Depending on the answer, you may need to shorten or lengthen the tread of each step to match the current rise, which is easy to do once we actually start building the natural stone steps.
Preparing to Lay the First Natural Stone Step Slab
To prepare the base stone step, check that the area you are planning to put your first stone on is a little higher than the surrounding ground so that it will have a proper space for drainage. It's also going to settle into the ground a little over time, so expect that too.
If it doesn't have the adequate drainage space to run the water away from the bottom steps, you can use a drain tile instead, either behind the bottom step or in front of it.
Usually, a 4" thick corrugated pipe and a 3/4" drain stone is used. You can cover it up with the geo-textile membrane to make it blend in better.
After covering this pipe, you're going to install your chosen stone. Check if the collected water is properly draining from the pipe's end off into the distance. If yes, then you are good to go. If not, you've blocked off the openings in the top of the pipe accidentally.
You need to use your shovel to dig out the surface area where the new step will be placed. Make this area larger than the step will be. Dig out the rectangle about 5" deep. Pound the soil within the bottom of this hole so that it's fairly flat.
You want to fill this hole at least 4" of A-gravel and pound it down too so it's flat. Then cover it in about 1" of bedding sand and pound it flat again. This is the flat surface that your stone step slab will rest upon. It is now not only flat but allows for water percolation and drainage and will resist bacteria growth.
We recommend using a manual compactor for pounding the sand, but of course, it also depends on the stone's size. A plate compactor is great for the first steps if you can afford to rent one. I've gotten away with simply using a flat shovel.
Lay Down Each Stone Step Bottom to Top
In this final step in our how to build natural stone steps guide, we're going to lay down the rest of your steps, working our way up from the 2nd step from the bottom and on to the top.
For your 2nd step, be careful that the step's face is a half-inch lower than the back of the same step. The point is to make sure that the water isn't standing on each step and is able to run down and then drain out.
You're making each natural stone step tilt forward very slightly, so that the water runs down them all towards the bottom step and the base ground, where it can either drain naturally or run into your corrugated drainage pipe.
Standing water is going to be bad for your stair case. Make sure you are either leaving a bit of space behind each individual step so the water can drain forward and off to the sides, or make sure the front of the next higher step overlaps the one below it slightly.
What you have to do is repeat the process of digging out the spot where the next stone will lie, adding in A-gravel and bedding sand and pounding it flat. Keep adding in material till you acquire the wanted height. Now place the stone step slab, making sure the slight forward tilt is there.
You should make the front of each higher step overlap the one below it by at least 1". To achieve the slight forward tilt you can use stone chips that have fallen off in your purchase as shims to raise the back ends upwards.
We are confident that as you build your way up the steps, one at a time, you're going to get it done just fine. That's how you build natural stone steps... one step at a time, literally.
How to Make Your Stone Steps Look Amazing
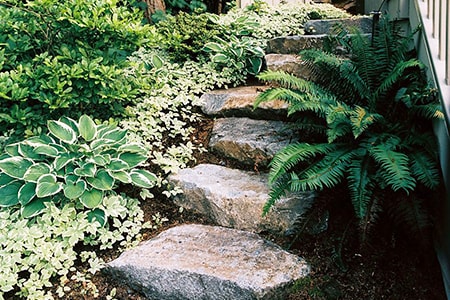
Once you know how to build natural stone steps and get it done, they're already a pretty addition to your yard, house, or garden. They transform the look of the area instantly. To decorate your natural stone steps, you should first consider where they are planted.
If they are in an informal place like your yard or garden, then they should be in a slope-like position. This gives a much naturalistic look to the area.
You can consider adding stone walls on the side if needed or you can add in flower beds to make your natural stone stairs look lovely. You can even add one of the types of arches over it and grow some climbing vegetables or vines up them.
You can also use inspirations from Google or Pinterest on laying down natural rocks, flowers, and plantations around them. Some people also want their staircase to be lighted with solar powered lamps, tiki torches, or stringed Christmas lights, for instance.
This is more important if the staircase is outside. Before you start DIY-ing the stairs, make sure you have planned out how to light them safely.
Now, for a more formal approach, cheek walls work best. They look elegant beside your staircase and give them a more delightful finish. Make sure to match the color and size for them so they work together visually with your steps. A coordinated wall would amp up your natural stone steps especially if they're on a steep bank.
For many house, steps are essential, but some people just want to highlight their landscape. Adding steps not only transforms the area but also adds beauty to it.
Steps are a great way of connecting your landscape. They also tell others about the style and look of your house and the atmosphere you seek to create.
If they are outside your home, they are work as an introduction, and if they are in your backyard, then they serve in adding to the magic and relaxation. I prefer a fantasy style setting, personally. If there's running water somewhere, all the better.
That's How to Build Natural Stone Steps
Building natural stone steps on your own can be tricky, and when we were researching it for our first time there wasn't any proper guide or step-by-step process available. We decided to write down a comprehensive guide for people who want to take this journey, even though more are out there by now.
This article is for people who are looking to invest their time in something productive and meaningful. The guide is simple to follow, and with beginner level knowledge, you will be able to comprehend it and take fruitful action.
Decorating your home brings meaning to the materials and peace to your mind. We highly encourage interested people to learn how to build natural stone steps.
You'll Also Enjoy:
- 19 Concrete Alternatives That Save Money & The Planet
- 28 Apartment Garden Ideas That Will Activate Your Green Thumb
- 5 Fence Alternatives That Innovate on the Traditional Style
- 31 Fence Ideas for Privacy, Boundaries, & Unique Designs
- 14 Drywall Alternatives That Bring Life to a Dull Room
Author: Rick Worst
 Rick is a home design consultant and enthusiast, whose life is consumed by all things home and garden. His consumption of books, magazines, websites, and TV shows on the topic is extraordinary. Rick serves as founder, author, manager, and web designer for our editorial team and website at large. Learn more on Rick's author page and all about Worst Room here.


