How to Fix a Crack in a Plastic Bathtub in 10 Steps
Author: Omar Alonso | Editor: Omar Alonso
Review & Research: Jen Worst & Chris Miller
Does your plastic tub have cracks? There's no need to stress. Plastic bathtub crack repair is easier than you might expect. You may not need to replace it or spend hundreds on hiring a professional to do the job. You can handle it yourself if the damage isn't too extensive.
Modern DIY repair kits cover several different types of cracks on plastic tubs. This post unpacks everything you need to know about assessing the repair job, the materials you need for the job, and a step-by-step guide to fixing your bathtub.
What Causes a Cracked Plastic Bathtub?
If your plastic bathtub is cracking, it's for one of three reasons. The material is inflexible and lacks support. It experienced damage from heavy objects dropped on it, or aggressive cleaners weakened the structure.
Plastic is not a durable material, and brands use different manufacturing processes. Some tubs have thicker reinforcing, and others may use thinner layers, exposing the tub to cracking faster than others. Over time, tubs with thinner walls may see pressure cracks starting to form. In other cases you'll start to deal with a peeling bathtub.
Cracks will start to form, and if you drop something heavy in the tub when it's dry, it could cause cracking. Or the drop may cause a divot or dent in the material, resulting in crevices and cracks over time. Using highly abrasive household cleaners like bleach to clean the tub might seem like a good idea to remove grime and dirt rings.
It eats away the gloss and the finish of the tub, allowing moisture to penetrate the materials. Eventually, the tub materials lose strength and resilience, resulting in the formation of cracks. Leaving them unattended means they worsen over time, resulting in damage that might cause leaks.
Types of Bathtub Cracks
We can classify the types of cracks in your plastic bathtub into two categories.
Hairline Cracks
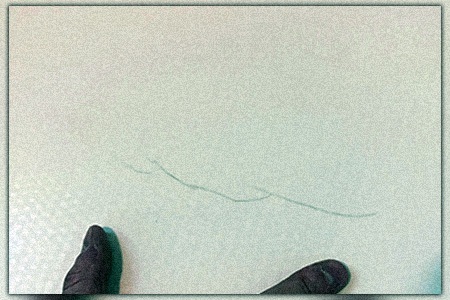
A hairline crack result from constant use and abuse on the tub. Eventually, this behavior compromises the strength of the material, resulting in small, thin cracks.
Over time these cracks will destroy the overall integrity of the bathtub. Fortunately, a DIY repair kit is all you need to repair these cracks and restore your plastic bathtub before they cause bigger problems.
Stress Cracks
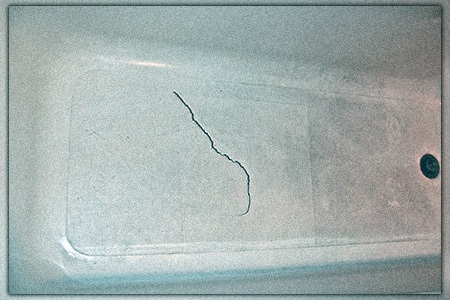
Stress cracks form in our plastic bathtub when you accidentally drop heavy items, like that large bottle of bubble bath, onto the tub. Generally, these cracks are at the surface level, making them easy to repair.
Visit the home improvement store and purchase a DIY kit for rebuilding your plastic tub. It's easy to use, and you can get your tub looking like new, preventing further damage.
How Do I Determine My Bathtub Material?
Most types of bathtubs that aren't made of ceramic or porcelain materials are made with either acrylic or fiberglass. If you need clarification on what material you're working with, send a video of the crack to your local handyman and ask them for their opinion.
If you don't want to call the handyman, you could search DIY repair sites for more examples of plastic tubs past what we have here. Also search for "acrylic bathtubs" and "fiberglass bathtubs" as they're similar but not the exact same, though the repair process will be.
You'll find options like fiberglass reinforced plastic (FRP), gelcoat or lascoat, and vikrell. All of these are created in the same fashion by heating, molding, and curing plastic, though they'll be coated and comprised of varying chemicals to bring different benefits. These bathtub alternatives crack the same and require the same repairs, though.
A Step-by-Step Guide to Plastic Bathtub Crack Repair
When your DIY kit is ready, it's time to fix the tub. Follow this step-by-step guide for the best results with your repair project. This is how to fix a cracked plastic bathtub:
1) Assess the Crack Severity
Hairline and stress cracking requires surface repair. If the cracking is extensive, call a professional if you're unsure if the tub is salvageable. The bigger the damage, the more noticeable your repair job will be after using the DIY repair kit.
DIY repair kits have limitations, and calling a handyman or professional repair service helps you avoid a sub-par repair resulting in water leaks. You'll need to weigh up the cost of repair versus a replacement. Consider the effort, time, and repair kit cost before attempting the job.
2) Purchase the Right Plastic Bathtub Crack Repair Kit
Several DIY plastic tub repair products are available from your local hardware retailer and online from Amazon and Walmart. Choosing the right kit for your tub is important, or the repair material won't bond properly, resulting in a failed repair.
You'll need to know if you have a plastic or fiberglass tub. Both types have different epoxy repair kits. Kits come in different styles. Some are complete with everything you need to do the job, and others might only feature essentials like epoxy resin. We recommend going with a complete kit.
You'll need applicators, protective gloves, and sandpaper to finish the job. If you don't have all that on hand, consider getting a complete kit with everything you need.
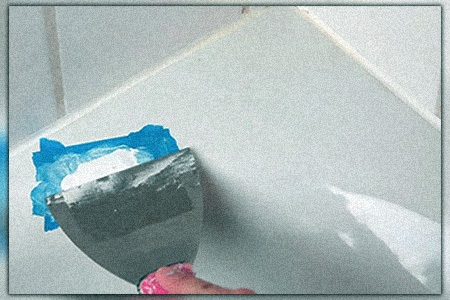
3) Clean the Plastic Bathtub
Remove debris and dirt from around the cracked area of the tub. Sand the cracks using 140-grit sandpaper to break loose the debris and cracks. Proper cleaning is essential to ensure a clean surface for the epoxy resin to stick to.
It's important to remove all soap and grime before applying the resin. Failing to clean it properly means the epoxy won't stick. Use a rubbing alcohol product to help you get the cleanest finish possible. After cleaning, allow the surface to dry.
4) Cover & Protect the Fittings & Fixtures
If you have cracks around the drain, cover the drain and any other surrounding fixtures with masking or electrical tape to prevent damage during the repair process.
5) Create the Filler Key
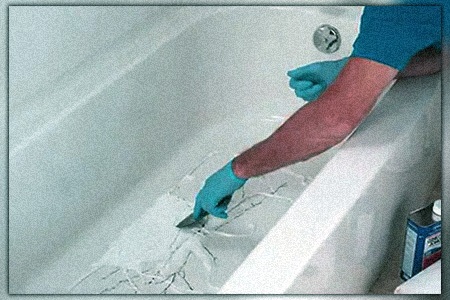
The repair compound must adhere to the surface properly. Cut a 1mm to 2mm groove along the crack using a thin razor blade. This incision provides a key for the epoxy resin to stick to.
6) Prepare Your Crack Repair Agent
Your DIY repair kit includes an epoxy resin or a filler putty. Follow the manufacturer's guidelines for mixing the epoxy and the activating compound. After mixing, you only have an hour or so to work with it before it becomes unmanageable.
7) Apply Your Fix
Spread the epoxy or filler into the key you cut around the crack. Some kits may come with stick applicators or a syringe for the task. Create a smooth finish to assist with sanding.
8) Let the Filler Dry
Follow the manufacturer's guidelines for drying and curing times for the resin. If you sand the area before the filler cures, you risk removing it or damaging the integrity of the repair. The cure time could vary from two to 24 hours, depending on the manufacturing brand.
9) Sand & Polish
Use 180-grit sandpaper to sand down the repaired surface to a smooth, polished finish. The repaired area should be flush with its surroundings. You should repeat steps 7 & 8 if the repaired area isn't flush.
To help you receive a flush surface, do not use any powered types of sanders, period. You don't want to use any rounded surfaces to wrap your sandpaper around nor do you want to use your bare hand or fingers. Wrap the sandpaper around a flat piece of wood. This will create a broader, flat sanding surface that will result in a flatter, smoother ceiling surface when you're done.
10) Paint if Applicable
The crack repair should match the rest of the tub. If your tub is another color other than white, buy a color-matched DIY repair kit to get the perfect finish. Using a color-matched kit prevents the need for painting the plastic bathtub after the repair. If the repair kit isn't color-matched, blend in a pigment or buy specialist bath spray paint to blend the crack repair seamlessly.
How Much Does It Cost to Fix a Plastic Bathtub?
How much will you spend repairing the cracks in your bathtub? It depends if you choose to go with a DIY repair or if you choose to hire a professional. You'll need to hire a professional if you don't have handyman experience or the thought of doing the repair yourself seems intimidating.
Professional Plastic Bathtub Crack Repair Costs
Hiring a professional handyperson to repair and refinish your plastic bathtub can cost $80 to $120 per hour. Most should be able to fix it in two or five hours, depending on the extent of the cracking and if you desire a reglazing. Expect to pay service fees and taxes as well, totaling between $275 to $600 dollars.
They'll likely have to do the job in two phases. They prep the surface, add the filler, and then return the following day to sand a paint it after the resin dries.
Hiring a handyperson ensures you get a professional finish to the job and a guarantee on the work. If the cracks open again or the tub leaks, they'll have to redo the repair. Also, if they damage the drain or anywhere on the tub, they're liable for the repair costs, not you.
You have plenty of options for hiring professionals online. Ensure you choose someone or a company with a good reputation. Look at what people are saying about them online before hiring their services.
DIY Plastic Bathtub Crack Repair Kits
A DIY plastic bathtub repair is easy if you have handyman experience. You have options for surface and internal repair kits. Typically, you'll pay around $30 to $40, making it much more affordable than hiring a professional.
Plastic Bathtub Crack Repair Made Easy
If you have extensive cracking in your tub or it's leaking, it might be time to call a professional repair service or consider buying a new one. If you're unsure what to do, call a professional in your area for advice. If the crack is small and manageable, by all means, follow our plastic bathtub crack repair procedure above. And that's how to fix a crack in a plastic bathtub in 10 easy steps!
You'll Also Enjoy:
- Is Duct Tape Waterproof? No, But It's Resistant
- Can You Paint Granite Countertops? Yes, You Can!
- Plastic or Wood Toilet Seat? The Pros & Cons of Each
- Little Black Worms in the Shower? How to Get Rid of Drain Flies
- 10 Types of Hot Tubs & the Features for Max Relaxation
Author: Omar Alonso
 Omar has over twenty years of experience as a professional handyman and electrician, with an emphasis in HVAC, general maintenance and repairs, and interior and exterior construction. He shares this knowledge with us as a writer on these topics. He is also a voracious reader. Omar serves as editor for our editorial team, author, and as a source of endless information for our researchers. Learn more on Omar's author page and all about Worst Room here.


