How to Make a Cutting Board: It's Not as Hard as You Think
Author: Rick Worst | Editor: Omar Alonso
Review & Research: Jen Worst & Chris Miller
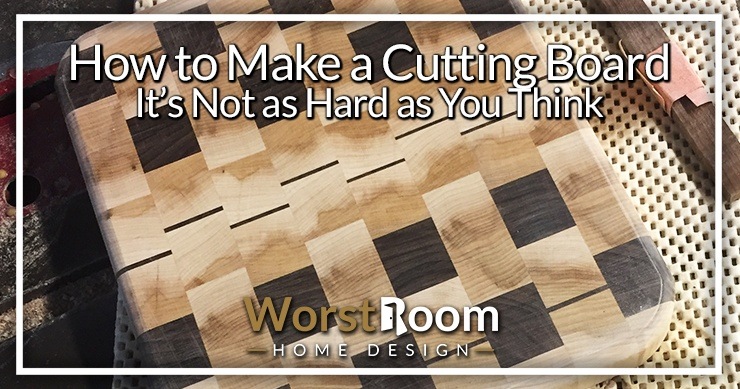
So you want to know how to make a cutting board. As we tend to do, my brother and I were hanging out in his garage last Sunday afternoon and we never have idle hands, so we went about working on his Christmas gifts for the family: homemade cutting boards.
He'd made an end grain cutting board before and decided one for each family unit would get him off the hook in terms of spending money.
Because he has plenty of scrap wood lying around, he's decided to make designer cutting boards, butchers blocks, and serving trays, and it's not going to cost him a dime.
Fortunately I was around to help and document the process, and so we lay it out here for you to follow along and make your own DIY cutting board.
You can get all of this done by hand, but better yet if you have access to some tools, which we used (as you'll see in the picture tutorial). Let's get started.
Let me list out some of the tools we used. You can use any hand-held variant, but we used power tools. As always, practice extreme caution and safety measures.
We used a miter saw to cut the hardwood planks to length. We used a table saw to establish the width of each scrap plank. You'll need a planer to get each plank to the same thickness. You'll absolutely have to have clamps for gluing.
If if you want a big radius on your rounded edges you'll need a router and a roundover bit, and a belt sander doesn't hurt (you can swap in any types of sanders if you know how to use them properly). Beyond that, you'll want mineral oil, wood glue, a glue brush, and some sandpaper for the finishing touches.
How to Make a Wood Cutting Board
Here's what you can expect as you scroll through. First you'll see the image-based tutorial with descriptions of everything we did, and then we'll cover some frequently asked questions that'll save you some study time. The process will go like this:
- Prep your wood to the right length & thickness
- Layout your design however you like it
- Glue the slats together using clamps
- Cut the cutting board to the desired shape
- Sand it down & oil it up, then let it dry
If you're going to do a handful of these, it's easiest to treat it like a conveyer belt and perform each step for each cutting board before moving to the next step.
1. Gather Scraps or New Hardwood for Your Cutting Board
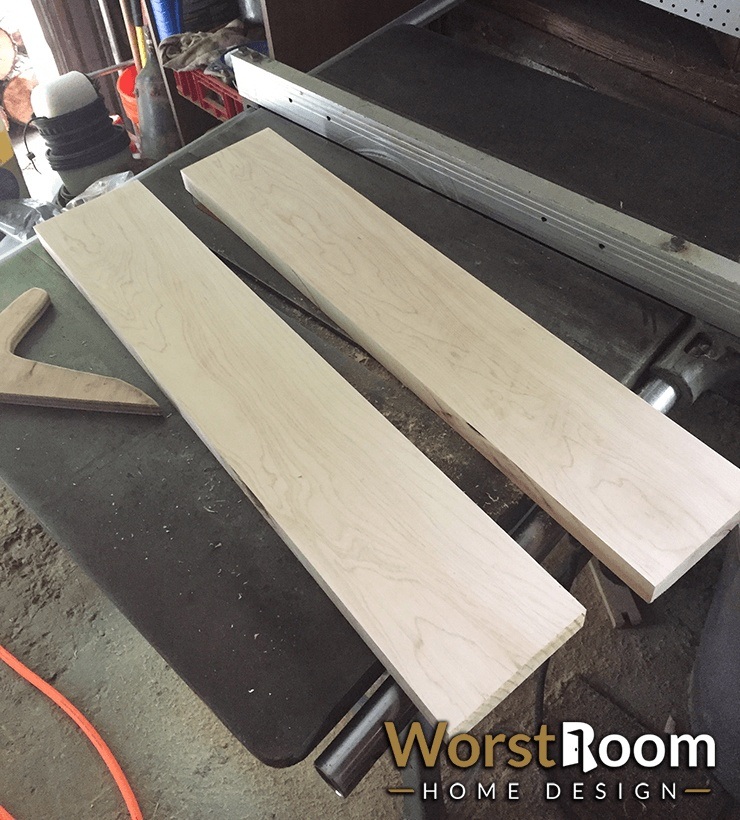
This is a silly step, but the main point is to lay out your wood options so you can make real decision. We decided to use maple for the majority of the cutting board along with walnut for darker accents. We also made sure they were free of knots and other blemishes and to choose the types of wood grain patterns we liked the best.
Two thing you want to think about here is making sure you have enough length for the number of cutting boards you intend to make while taking into consideration some waste you'll have.
I'd figure at least three inches of waste in the width direction per cutting board based on staggering (you'll see that later) and routing the sides down while possibly needing to fix mistakes.
You'll also want to think about the thickness of your boards and if you're making thin cutting boards or thick and heavy butchers block style ones. You can make them thinner or thicker, but remember to save room for planing and sanding.
2. Plane the Boards to Exact & Equal Thickness
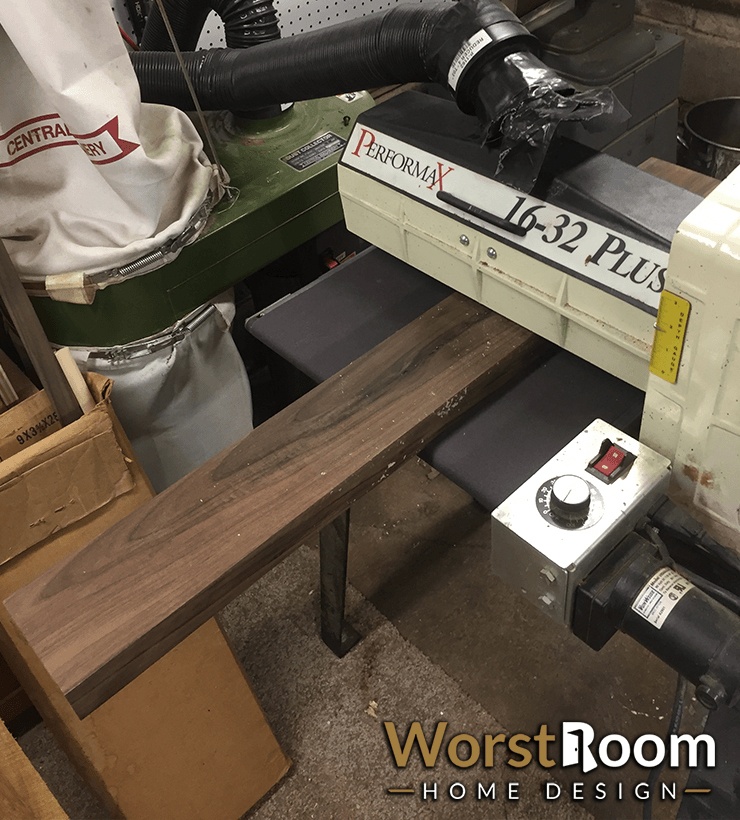
Here, we're planing the long boards so that they're all the same thickness. Your boards may be less long if you're only making one cutting board, but we're going to get three out of this.
When you planned your original thickness, hopefully you realized you'll have to plane some of that off. If your boards are relatively flat you'll lose far less than if you're working with warped wood.
The reason we're planing them is so that the pieces sandwich together perfectly later. The face grain side will be the parts that receive the glue and get clamped together.
3. Rip Your Boards Lengthwise on the Table Saw
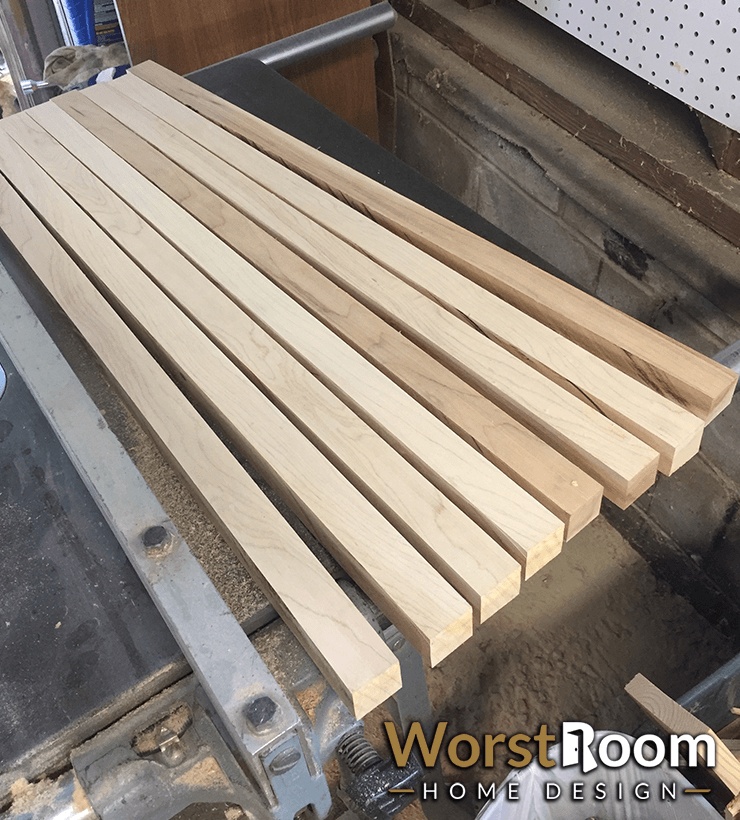
Now you want to rip your boards lengthwise in the direction of the grain. Your consideration here is whether you want uniform-width strips or if you want to vary that up for the aesthetics.
We kept it uniform around 1.5 inches for the main strips (and the same for the thickness).
Like the above steps, remember that for every cut you make here you'll have to subtract the width of the table saw blade. This is usually 1/8th of an inch and is called the kerf.
That may not seem much but if you cut 8 strips then you've already lost an inch off of your original boards. Make sure you take this into account!
4. Figure out the Design of Your Cutting Board
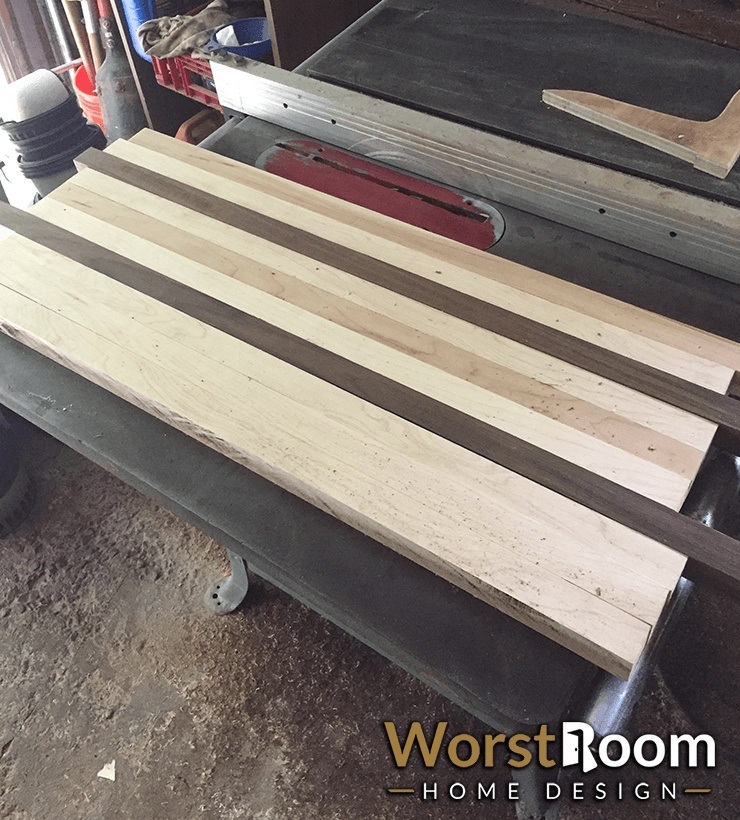
Now that we have our wood cut, we can mix and match the colors to create the cutting board design we want. Since we used uniform widths, all we needed to decide was where the darker walnut strips would go.
Further down you'll see another one we made with very thin walnut strips as accents added in.
This is the fun part where you can flex your creativity. If you're using varying width strips, you'll want to decide how close together they should be based on their widths and colors, etc.
But realize this isn't the final layout. Make sure you read the rest of the steps below before you go through this one to understand the ramifications based on future cuts.
Please make sure, and this is critical, that you have the smooth face grain that you planed pointing up and down on all of the planks here.
It should look as pictured, where the edge grain what is on the sides and the end grain are the small surface areas at both ends of each plank. This matters because we ultimately want the hardest end grain as the top of the cutting board.
5. Glue & Clamp Your Design, Then Sand
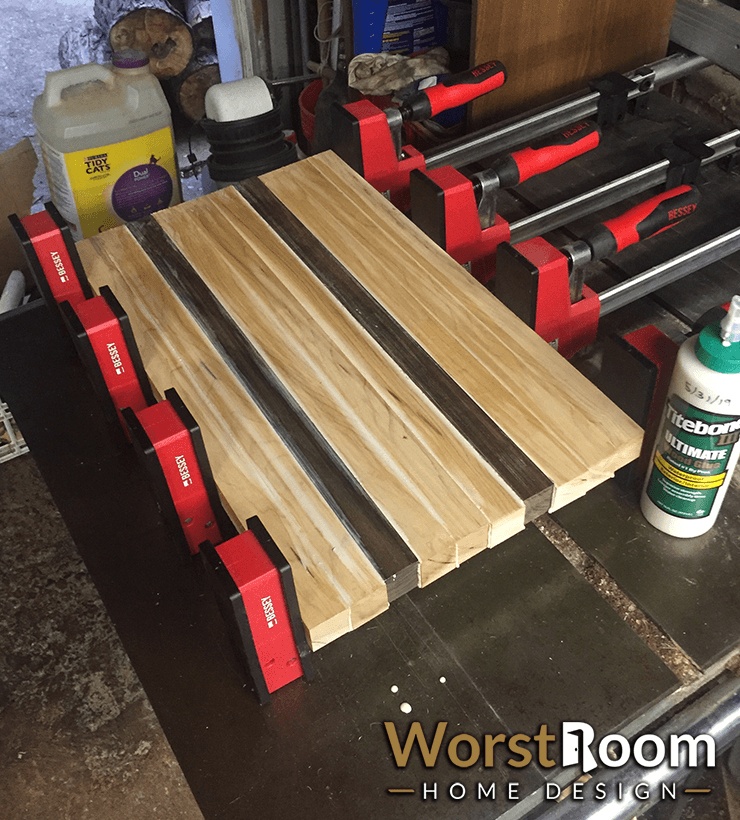
Using wood glue and a rag or glue brush, coat the sides of each plank (and only the insides of the outer planks).
Be generous but not too generous because once you clamp the planks together you'll squeeze out a lot of excess glue. But this also makes sure it squeezes into all of the crevices, too.
Depending on the temperature and humidity, you could be okay to continue on within 30 minutes to an hour, though if you want the glue to cure all the way you'll want to give it 24 hours.
The main reason is you don't want glue gumming up your table saw in the next step. If you don't wait long enough, you'll have that gumming plus the planks could come apart on you.
You can see in the picture that having extra glue on the top and bottom faces isn't a big deal. Once dry, you'll sand those faces lightly to remove the dry excess. If you have too much you can wipe it off with a damp rag, but otherwise don't worry about it.
6. Cut Again Across the Grain
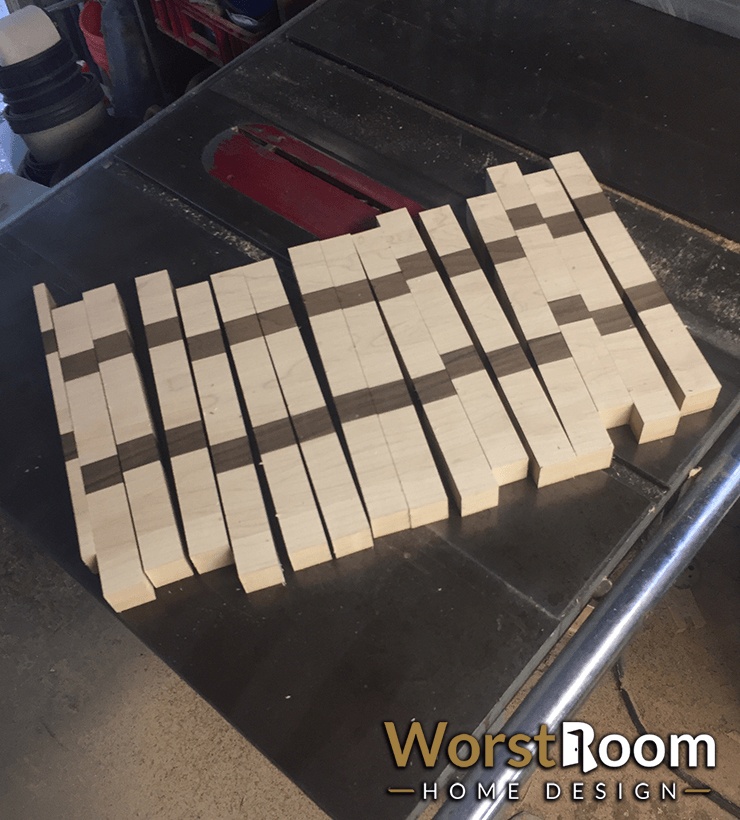
What you see pictured above is the same face grain surface of our previously glued and clamped boards after they've been sanded very lightly with a palm sander to knock off the extra glue. We've also gone ahead and cut across the grain, perpendicular to the fibers.
We chose to do this at the same widths as we did previously so we ended up with square shapes throughout. You'll notice on the far left that we already have a bit of waste, which is fine because we planned for that.
7. Turn Your Cutting Board Planks End Grain Up
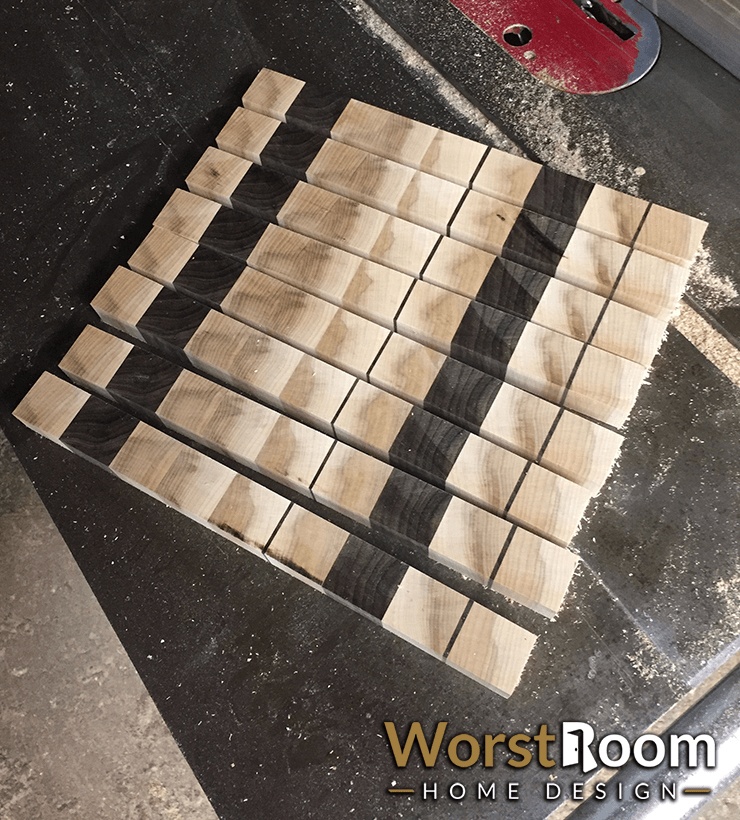
You're probably wondering why we cut again, this time across the grain. This is so we could then turn each segment of the cutting board in such a way that our new surface is comprised of all end grain. This is a much harder surface than face grain and even edge grain.
End grain also has a self-healing property where the fibers will expand and close gaps where a knife penetrated deeper than expected.
If you use face grain you'll have a cutting board that is no good pretty soon due to all the knife slashes, and edge grain surfaces will do the same but be a bit more durable.
Most cheap cutting boards are made from edge grain because it allows you to skip this extra step of cutting and gluing again. We're making luxury, designer cutting boards so we can't settle for that.
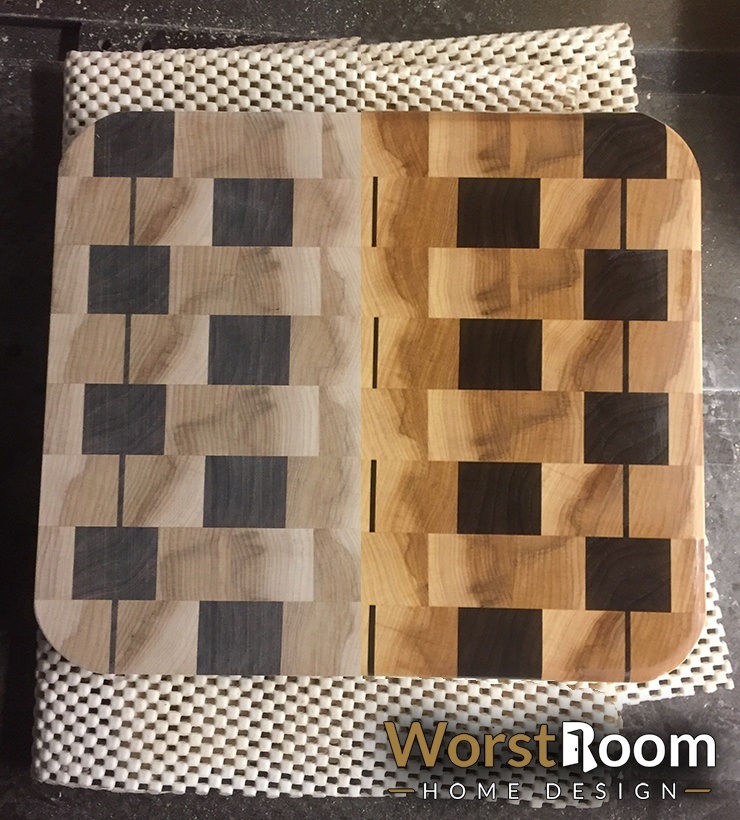
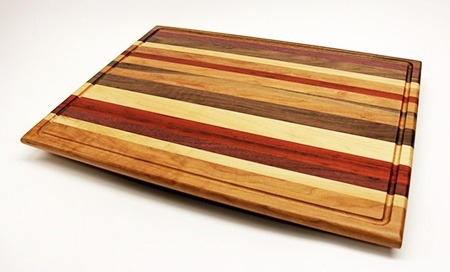
You can recognize end grain visually, but most people know it's an end grain cutting board by the checker board pattern that's a result of how it's built (exactly like this tutorial).
8. Enhance Your Cutting Board Design by Staggering
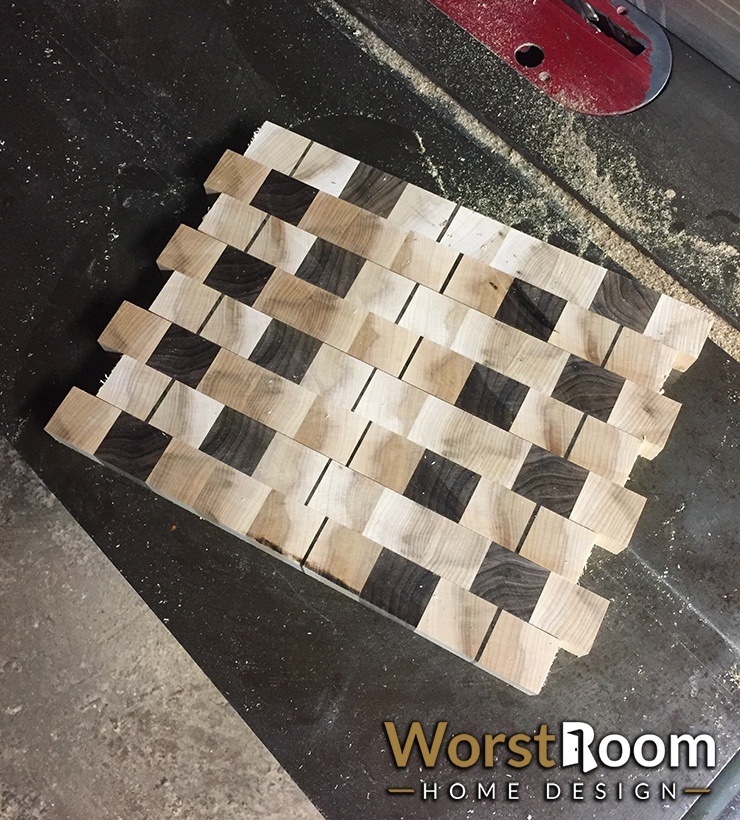
That last step was really simple, but it afforded us a chance to do some explaining and educating. We could have combined it with this step, which is to stagger your new wood strips in a way that enhances the design.
You certainly don't have to, but by doing so it shows how much extra labor goes into an end grain cutting board, and most people judge quality based on effort when it comes to handmade cutting boards.
One more thing I'd like to point out is in the step above and this one, you should notice that I got distracted and forgot to take pictures, so now we've started back up in the same spot but with a different cutting board.
This one features thin 1/8th inch strips of walnut for extra flair. So no, you weren't going crazy, I just goofed up and stopped taking pictures on the previous board.
9. Glue & Clamp the Face Grain Sides
Once again, we're back to gluing, clamping, and waiting. This time I would warn you against being too sloppy with the glue. Go ahead and be generous with the amount, but also go ahead and clean up the excess this time.
The reason for this is because end grain is much more difficult to sand and you don't want glue seeping into these grains. This is the surface that your food will be on, and you don't want glue particles ending up in your food.
Try to keep as little excess on the top and bottom surfaces as possible. If you look closely you'll see some in our pictures, but it's a light amount that we'll sand off, either with a palm sander or a couple passes through the planer.
And notice, again, how much waste we're going to have in the next step thanks to the staggering. It's worth it as long as you planned in advance for it, which I warned you about in step one.
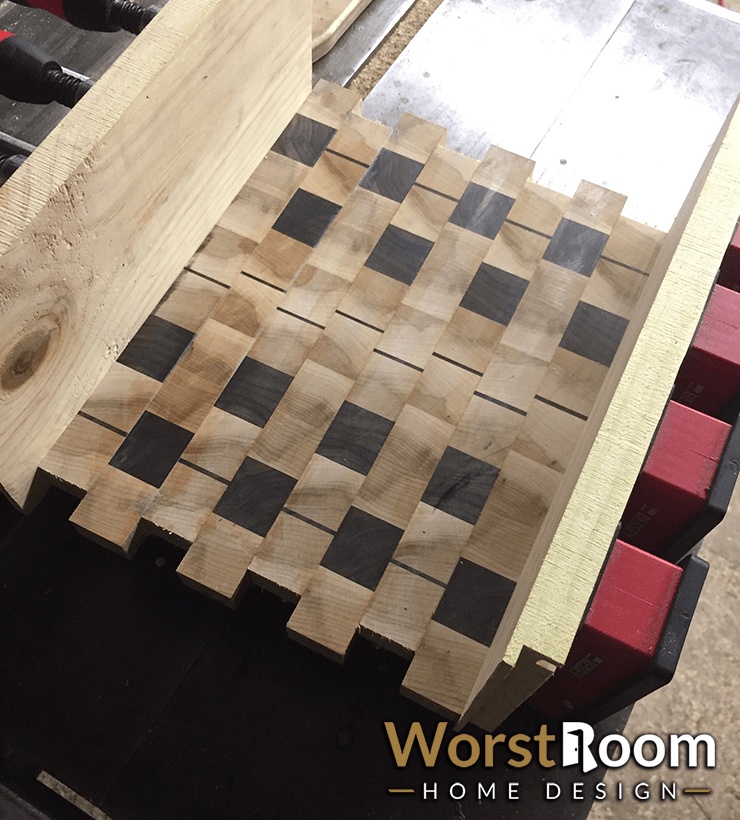
10. Clean the Staggered Sides With the Miter Saw & Sand Again
The two differences that you see now in the image above is that we used the miter saw to cut the staggered sizes off, and we sanded all of the surfaces lightly again. This knocked off the tiny bit of glue left over and any splinters that may have been sticking up in the end grain.
You may consider, after sanding, spraying the surface down with water and wiping it off to raise the grain, before sanding again at a finer grit.
Maybe you'll want to repeat this process one more time if you want an ultra smooth surface, moving up to 320 grit and even 400 grit sand paper.
Notice how the end grain looks. Not only does it bring in much more character visually, but it's a much harder surface to defend against the knives.
Imagine cutting a tree down and standing on the stump and looking straight down onto it, where you can count the tree rings. That's end grain and what we now have on our cutting surface.
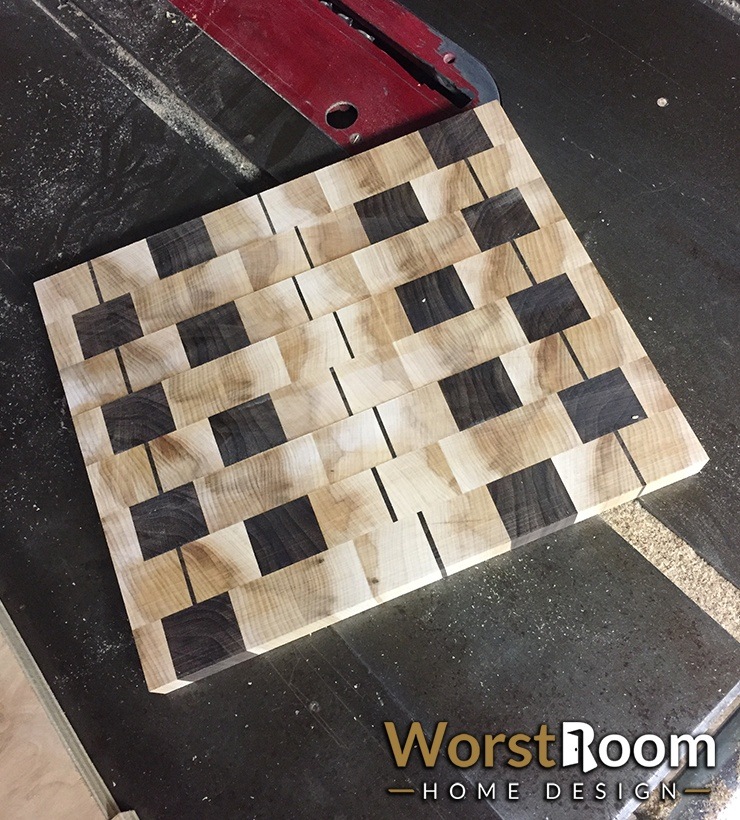
We now have a bonafide wood cutting board, but it's a plain rectangle with sharp corners. Let's decorate that up a little bit and make softer corners.
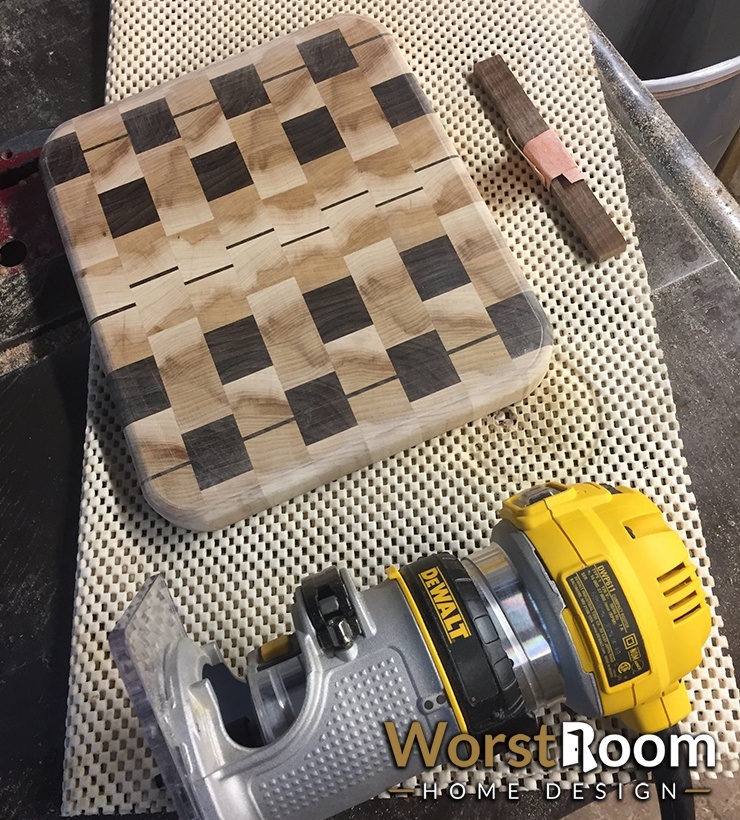
11. Route the Sharp Corners to Taste
This is another area where you can get creative. You can have longer or shorter radius corners. You can chamfer the long edges however you want, whether flat or rounded and choose a depth.
Rounded feels friendlier while a flat 45-degree side feels more sophisticated, but remember you'll want to do both sides so make sure your choice makes sense.
Another consideration if your cutting board is large enough is you may want to route in a juice groove, which is the rounded channels that go all the way around the edges of the cutting board.
It's meant to collect vegetable and meat juices so they don't run off the side and onto the counter top.
My brother doesn't like them so we didn't make any here, but you can see them below where we share other design options like adding feet pegs, handles to the sides, a hanging hole, etc.
12. Apply Mineral Oil to Seal & Finish
The final step, and the most satisfying, is to dump some mineral oil on your cutting board and work it into all of the surfaces. This is only the first coat, but you'll already be amazed at how much color and life comes out of the wood.
Let this first coat of plain mineral oil soak in for perhaps 5 to 10 minutes and then wipe it down. Get rid of the excess and take a short break.
We prefer to repeat the first coat with a second to ensure the end grain gets fully saturated. This is what provides the self-healing aspect to the end grain.
It needs to soak up this oil so it's fluffy enough to continue to push together against itself in all directions after a kitchen knife passes over it.
This final step is icing on the cake. You can skip it, but it's worth doing. Get you a blend of mineral oil and beeswax (that's the brand we use).
It helps seal the hardwood a bit better, provides better water protection, is safe to be in contact with food, and most importantly adds an amazing sheen that you can buff before passing it out as a gift.
If you find the cutting board becomes dry over time, simply apply another coat of mineral oil, allowing it to soak for around 5 to 10 minutes and then wiping off the excess. Some people do this once a month.
I say to do it when needed, rather than turning it into a regularly scheduled maintenance task. Some people use walnut oil instead of mineral oil, which is fine too.
And now you're done! Wrap it in pretty wrapping paper, add a bow, slap on a label, and now your mother in law can't complain at you this Christmas. Now let's cover some common questions you may have.
Wooden Cutting Board FAQ's
I recognize the above is a lot to read. I've covered most of this already but let's do it in an organized fashion.
What Tools Do You Need to Make a Cutting Board?
If you don't mind everything taking longer, you can use a hand saw and hand-held sandpaper to get everything done.
But if you want to complete your board in a normal amount of time, you'll at least want a miter saw and table saw, if not a circular saw if you have the steadiest hands in the world.
An electric sander like a mouse sander or a random orbit sander, or better yet a planer, will speed things things up drastically. Some items that are not negotiable are big clamps and wood glue.
What is the Best Wood to Use to Make a Cutting Board?
The best wood to use are hardwoods like ash, birch, walnut, cherry, hickory, mahogany, maple, and oak, as limited examples. Softwoods like cedar, pine, fir, and spruce are not appropriate as they will become damaged too easily and end up storing bacteria.
The edge grain of a hardwood is better than the face grain, and the end grain is better than the edge grain. It's all about firmness and resistance to damage.
It's better to use wood from a tree with edible sap or edible nuts to ensure you aren't exposing your food to materials that can result in sickness or an odd taste.
How Do You Seal a Homemade Cutting Board?
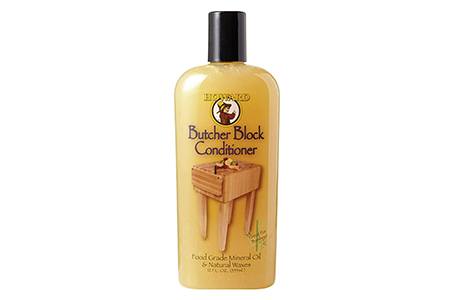
To seal a cutting board, use food safe mineral oil. You can also use a blend of mineral oil and beeswax. Our choice above uses both of those as well as carnauba wax.
You never really seal a cutting board, only finish it to make it liquid resistant and to provide self-healing properties by allowing the end grain to soak up the oil. The key is to make sure it's food safe oil.
Walnut oil will suffice as well, but don't use organic oils like vegetable oil, olive oil, and most other nut oils. They contain fats that will begin to stink and turn rancid. Think about who has nut allergies as you make these decisions, too.
Some will recommend using linseed oil and tung oil in order to harden the wood and actually seal it.
I'm of the opinion that you don't want to seal it that firmly, because it doesn't allow the end grain to heal itself from kitchen knife strokes as easily. The end grain needs to soak up the mineral oil.
How Thick Should a Cutting Board Be?
This is entirely up to your preference. If you want a thin board you can store easily, that is fine. Or perhaps you want a thicker butchers block. You can range from half an inch thick up to two inches and beyond. This is a matter of taste as opposed to there being a correct answer.
How Long Do I Keep the Cutting Board Clamped?
When making your cutting board, there are stages where you need to clamp the wood as the glue dries. Depending on how hot and humid it is, these times can change.
Dry weather with lots of heat means you could unclamp and continue working on the board within 30 minutes to an hour. For a full cure of the glue, allow for 24 hours of drying time.
What Oil is Best for Cutting Boards?
Mineral oil is the most commonly used choice of oil for cutting boards, though you can use a mineral oil and beeswax mixture. Some recommend walnut oil but consider if your patrons will have a nut allergy.
You'll hear mention of linseed oil and tung oil since they dry harder, which may be okay for a face grain or edge grain cutting board, but for end grain avoid these.
Do not use any organic oils like olive oil, vegetable oil, and nut oils (including walnut oil) due to the natural fats that will soak into the wood and begin to rot and become rancid. They will stink and harbor bacteria.
Which Woods are Food Safe?
You want to select a hardwood first and foremost, but one that has edible sap and/or edible nuts. These are food safe woods and will ensure a natural taste that isn't off-putting. Avoid woods from trees that grow nuts if you're taking nut allergies into consideration.
If you have more questions, they're probably listed and answered here by this cutting board company, BoardSmith.
More DIY Cutting Board Designs & Plans
Here are five more cutting board designs (not made by us!), chosen not because they're particularly clever or amazing, but to show you some general ideas you can integrate into your own plans.
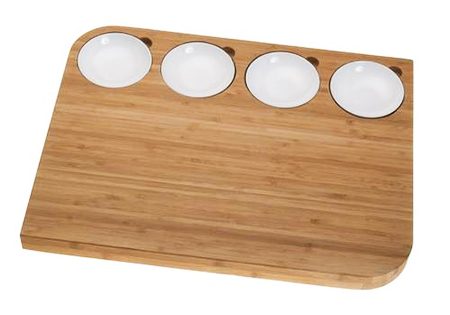
The board above has multiple interesting features. They chose to route and round off only two of the main opposing corners, while leaving everything else sharp.
They didn't even chamfer the long edges. But the standout feature are the bowls where you can push separate vegetables or meat cuts into. When done, you can use the finger slots to pick the bowls up and then clean the board. Pretty neat and easy to make.
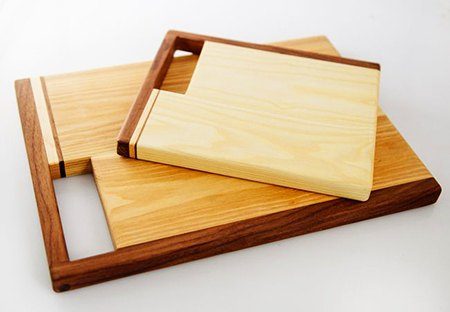
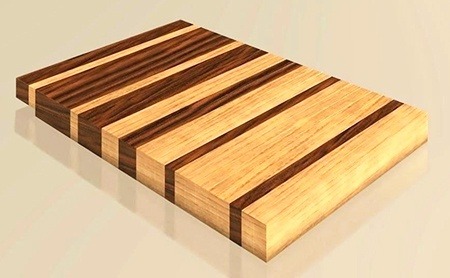
The above boards are interesting. They are face grain cutting boards with handles built in, making them easy to carry or serve from. The smaller one is definitely more like a cheese tray.
But the contrast of the border colors against the main wood looks fantastic, and these builds are so simple you could knock out 20 of them in a day, given you had enough clamps.
The reason I'm sharing this one is to point out how you can use several different types of wood (I count four here) to really get a visually appealing design going. But the main reason is I wanted to show you what a juice groove looks like.
It's the routed channel around the outside of the top surface meant to collect vegetable and meat juice so it doesn't spill off and make a mess.
I just like this one above. They cut their two boards to various widths so they could invert them before gluing to create this fading effect where one color transitions to the other.
There are tons of far more involved and fancy designs out there but this one is realistic in terms of the time it'll take to make it while including the fact that you'll be cutting on it.
Why go too far when it's meant to be destroyed over time. I've seen some this thick with slots on the sides that let you slide different types of spoons and knives into them. To me, that's too much and you won't actually use them, even if they seem like cool features.
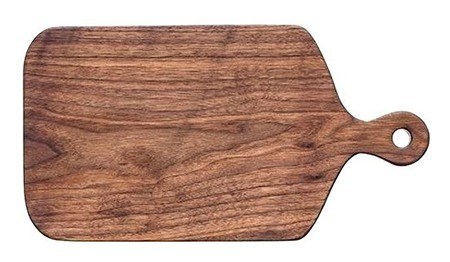
Ignoring the fact that this one is also face grain up (a no-no), I wanted to show you the classic style with the handle build into one side with a hole cut out so you can hang it with your pots.
This shape is what my mom and grandmothers always had growing up, so I'm fond of it. It's particularly useful for shuttling ingredients around as you're cooking.
And That's How You Make a Cutting Board Out of Wood
As you can see, making a cutting board isn't that difficult, even if you want to result in a design that looks like it required tons of effort. But I must admit, the barrier to entry is having access to a ton of tools and a garage to store them in.
Doing this by hand is possible but would take forever. But with the right tools and our tutorial, you'll be pumping out all kinds of unique cutting boards in no time.
You'll Also Enjoy:
- 28 Kitchen Sink Ideas to Impress While Best Utilizing Your Space
- 31 Fence Ideas for Privacy, Boundaries, & Unique Designs
- How to Remove Rust From Tools (Prevention Tips & More)
- Standard Garage Size: Diagrams & Dimensions Up to 4 Car Garages
- How to Get Rid of Fungus Gnats - Quickly & Permanently
Author: Rick Worst
 Rick is a home design consultant and enthusiast, whose life is consumed by all things home and garden. His consumption of books, magazines, websites, and TV shows on the topic is extraordinary. Rick serves as founder, author, manager, and web designer for our editorial team and website at large. Learn more on Rick's author page and all about Worst Room here.


