How to Shim a Toilet Successfully in 6 Easy Steps
Author: Omar Alonso | Editor: Omar Alonso
Review & Research: Jen Worst & Chris Miller
Your guest comes out of the bathroom with a shocked look on her face. You already know what's wrong. That wobbly toilet is a real doozy and a shocker to sit on. It's time to take action and fix it. Let's show you how to shim a toilet and stabilize it. After all, rocking is for concerts, not the bathroom.
How to Shim a Toilet in 6 Steps
Please note that I highly recommend you read this entire procedure before you begin. This way, you'll know exactly what to expect and in what order so that you don't encounter any surprises as you fix your uneven toilet. This is how to level a toilet with shims.
1) Inspect for Gaps
First, look for gaps around the toilet's base where it meets the floor. Clean up around the base to remove any debris or dust that might accumulate around the edges. Cleaning will expose gaps or holes around the base that are causing the rocking problem. If you notice any gaps, note the width and height. Some areas might have bigger gaps than others, requiring more shims.
2) Fit the Shims
After identifying the gaps, ready your shims for the task; toilet shims are available in rubber, wood, and plastic. We recommend using the rubber or plastic options over the wood. Moisture might penetrate the wood causing it to rot. Shims don't cost much, so the good news is this will be an affordable fix.
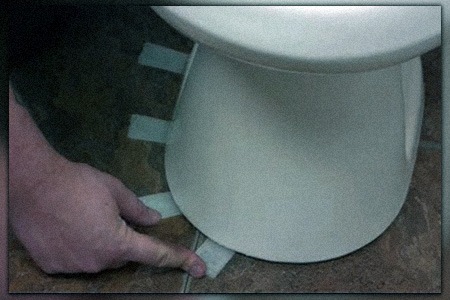
Use the shims to fill the gaps around the base. You can stack them for larger openings. Fortunately, this project takes little DIY skill, so you can do it without professional assistance. Level all the gaps between the floor and the base using the following process. This is how to install toilet shims:
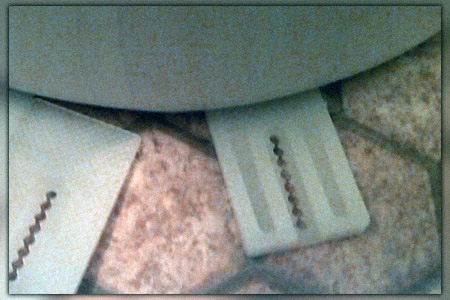
- Place a shim on the floor with the sharper edge facing the gap.
- Push the shim in place using your fingers until it has a tight fit.
- Give the back of the shim a light tap with a mallet to secure it in place.
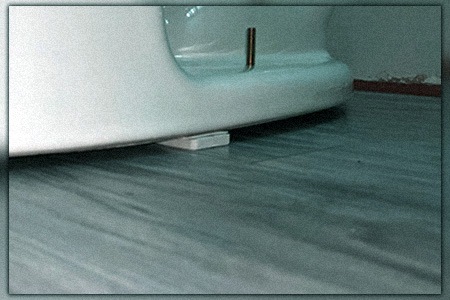
- Repeat the process for all the other gaps around the base.
- After you finish shimming, check to see if the toilet is stable.
So basically you're tilting the toilet into the position where it's level with the floor and filling the gaps with shims so that it can't keep rocking or wobbling as weight is applied to it. The toilet doesn't weigh so much that you won't be able to manipulate it.
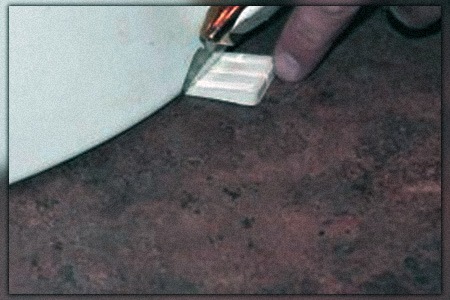
3) Trimming the Toilet Shims
Some gaps are bigger than others, so you'll end up with pieces of shim sticking out around the base. You'll need to trim the shims to give your project the desired clean finish. Cut the exposed piece of the shim away with a utility knife. When it comes to how to shim a toilet, this is what gives you a polished look at the end of the job.
Rubber shims are the easiest to trim, with the plastic ones being slightly tougher, requiring more effort to trim. Ensure you cut the shim at a slight angle towards the toilet bowl to prevent scratching the floor. Utility knives are sharp, and they cut into vinyl flooring. Try to the edge of the shim as level as possible to the toilet base.
4) Test & Flush
Test your work by sitting on the toilet. Shuffle your weight around the bowl to ensure there are no areas you missed. Next, you'll have to check the toilet bowl for leaks. Flush it and look for any signs of leaks. Chances are you won't have any problems.
5) Caulking the Base
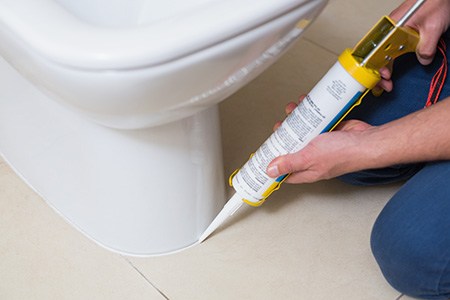
The last phase of the project is to caulk the base. While you've trimmed the shims flush, you'll probably be able to see the areas you shimmed if you look for them. Caulking the base creates a clean finish to the job, and you won't be able to see any signs of shims after you finish.
Follow these steps to caulk around the base:
- Clean the base and flooring around the toilet using an all-purpose cleaner and let it dry.
- Apply some masking tape around the base's edge and the flooring, leaving a small gap for the caulking.
- Purchase silicone caulk and a caulk gun from the hardware store and fit the tube to the gun.
- Trim the nozzle of the caulking gun to a small hole that's big enough to create a caulk bed that fits the gap.
- Squeeze the handle on the caulking gun to expel the caulk and run it all the way around the base.
- Fill a bowl with warm water and a few drops of dish soap.
- Dip your finger in the water and press it into the caulk, running all the way around the base for a smooth finish. The soapy water prevents the caulking from sticking to your finger.
- Remove the masking tape.
In the future when you want to get a fresh bead of caulk around the base of the toilet, know that for the first one or two times that you can caulk over caulk without needing to remove it all. But don't do this indefinitely.
6) Cure Overnight
It takes the caulk around 24 hours to cure. Don't wash the floor or the toilet for a day or two after caulking to prevent removing it. After it's completely cured, wash the toilet and the bathroom floor. And that, my friends, is how to shim a toilet.
FAQ’s on Shimming a Toilet
Whenever someone asks how to level a toilet with shims, there's generally a handful of other questions I end up answering, so let's cover those now in case you're also wondering the same.
What Are the Dangers of a Wobbly Toilet?
A wobbly toilet can damage the floor as it rocks back and forth. You might damage or dent vinyl flooring as the ceramic toilet bowl is a stronger material than the flooring. Eventually, over time, you're going to make the problem worse if you don't get around to shimming the toilet.
A wobbly toilet might also cause bacteria and mold to grow in the gaps between the bowl and the floor. Mold and bacteria thrive in moist, dark areas, like the gaps in the bowl and floor. Even if you clean around the bowl regularly, you might not get all the way into the opening to remove these pathogens, creating a health hazard in your home.
Can an Uneven Floor Cause a Wobbly Toilet?
It's usually not the case that an uneven floor is the cause of a wobbly toilet bowl. In most instances of this problem, the toilet flange and wax ring are the cause of the issue. Most types of toilet flanges are either a steel or plastic ring positioned around the outlet drain, found under the bowl.
The flange features a wax ring on the top, providing a protective layer to stabilize the toilet. If the toilet is wobbly, it's usually because the wax ring is degraded. If that's the case, you'll need to remove the toilet bowl and replace the flange and wax ring before shimming. Make sure you use the right toilet flange height.
Will Shimming Damage the Toilet?
Shimming the toilet won't damage it. In fact, it does quite the opposite. Shimming the toilet prevents the rocking motion from damaging the flooring around the toilet base and the base itself.
Following our guide and shim the toilet properly will eliminate the rocking problem and protect your flooring and toilet pipework from damage.
What Are the Types of Toilet Shims?
Knowing how to shim a toilet starts with knowing what your options are. Toilet shims are available in plastic, wood, or rubber. We recommend going with the plastic or rubber variety.
Avoid using wood shims if you can. Wood shims that aren't treated properly leave exposed wood after trimming the shims, which isn't good in a high humidity environment like a bathroom.
Moisture can enter a wood shim causing it to rot. Over time, the shim loses its structural integrity and crumbles, leaving you with the same rocking problem.
Plastic shims are available in several color options, allowing you to match them to the color of your toilet for a clean finish. We recommend caulking around the base, but that might not be necessary if you get a plastic shim in a compatible color.
If you live in a cold climate and your bathroom always feels as cold as a tomb in the morning, we recommend going with rubber shims. The constant cooling and warming of plastic shims might cause them to crack over time. Both plastic and rubber shims have enough strength to support the weight of the heaviest toilet bowls.
One last tip is that you can get away with using coins as shims if you want. Pennies are inexpensive and you can stack them as well. You won't be able to get perfectly precise like you would with a wedge shim but it can work out in many cases.
Why Do I Need to Caulk Around the Toilet Base After Shimming?
We recommend you caulk around the toilet base. Caulking provides a clean, consistent look to the base, providing a better finish to the project.
Silicone caulking is waterproof, preventing water and human waste from entering the same gaps between the floor and the shims where it might smell or promote bacteria and mold growth.
Caulking the base creates a watertight finish around the area, allowing for easier cleaning. Caulking also covers the shims, and your toilet will look new.
Do I Need to Level the Toilet?
No. Most toilet models don't require a level surface for operation. Floors in homes are already level or close enough to them to allow you to operate the toilet without damaging it. The purpose of shimming the toilet is to prevent it from rocking, not to level it.
Key Takeaways for How to Install Toilet Shims
Let's do a summary and quick recap of what we've learned so far:
- A rocking toilet can damage your floors and the toilet pipework if left unchecked.
- You have options for rubber, plastic, and wooden shims. We recommend going with plastic or rubber shims for the best results with your project.
- Shimming a toilet usually doesn't require professional help. You can complete the task with a few basic tools and limited DIY skills.
- Follow our guide to shim the toilet properly. Test the toilet to ensure it doesn't wobble before you caulk it.
- Caulking is always required, but we recommend you do it to get a clean and hygienic finish.
- If you want to take it a step further, remove the toilet bowl before the job and check if you need to replace the flange and wax seal, but this step isn't always necessary.
You'll have great success with a visually pleasing end result with just a little patience and care in your work.
And That’s How to Shim a Toilet
Say goodbye to your uneven toilet. Shimming a toilet can be done in such a way, by yourself, that you’ll have a level toilet and nobody will be any the wiser that that wasn’t the case. By the time you’re done caulking and basically blending in your work, it’ll look and work just right. That’s how to shim a toilet. You can do it!
You'll Also Enjoy:
- 4 Toilet Venting Options for Reduced Lingering Odor
- How to Fix a Running Toilet Without a Ball Float
- Can You Flush the Toilet When the Power is Out?
- Fabuloso in a Toilet Tank Long-Term is a Bad Idea
- 9 Toilet Colors & Shade Ranges for Your Personality
Author: Omar Alonso
 Omar has over twenty years of experience as a professional handyman and electrician, with an emphasis in HVAC, general maintenance and repairs, and interior and exterior construction. He shares this knowledge with us as a writer on these topics. He is also a voracious reader. Omar serves as editor for our editorial team, author, and as a source of endless information for our researchers. Learn more on Omar's author page and all about Worst Room here.


